ポリシーの管理
このトピックでは、ポリシーを作成、編集および削除する方法について説明します。
必須IAMポリシー
管理者グループにいる場合は、ポリシーを管理するために必要なアクセス権があります。
ポリシーを初めて使用する場合は、ポリシーの開始と共通ポリシーを参照してください。他のユーザーがポリシーを記述したり、他のIAMコンポーネントを管理したりできるかを制御するポリシーの作成の詳細は、コンパートメント管理者によるコンパートメントの管理およびアイデンティティ・ドメインのないIAMの詳細も参照してください。
リソースのタグ付け
リソースにタグを適用すると、ビジネス・ニーズに応じた整理に役立ちます。リソースの作成時にタグを適用できます。また、後でリソースを更新して、タグを追加、改訂または削除できます。タグ適用についての一般情報は、リソース・タグを参照してください。
ポリシーの使用
まだ行っていない場合は、ポリシーの仕組みの基本を理解するために、ポリシーの仕組みを参照してください。
ポリシーを作成する場合、アタッチする必要があるコンパートメント(テナンシ(ルート・コンパートメント)または別のコンパートメントのいずれか)を指定する必要があります。アタッチされている場所によって、後から変更または削除できるユーザーが制御されます。詳細は、ポリシー・アタッチメントを参照してください。コンソールでポリシーを作成する場合、コンパートメントにポリシーをアタッチするには、そのコンパートメントにポリシーを作成します。APIを使用している場合は、CreatePolicyリクエストにコンパートメントの識別子を指定します。
ポリシーを作成するときは、変更不可の名前も指定する必要があります。名前は、作成したコンパートメント内のすべてのポリシーで一意である必要があります。また、ポリシーの一意でない変更可能な説明である説明を指定する必要もあります。また、Oracleは、ポリシーにOracle Cloud IDと呼ばれる一意のIDを割り当てます。詳細は、リソース識別子を参照してください。
ポリシーを削除した後に同じ名前で新しいポリシーを作成すると、別のOCIDがあるため、異なるポリシーとみなされます。
ポリシーの書込み方法の詳細は、ポリシーの仕組みおよびポリシー構文を参照してください。コンソールを使用してポリシーを記述する場合、ポリシー・ビルダーを使用して、追加するポリシーの構文を作成できます。
ポリシーの作成、既存のポリシーの変更、またはポリシーの削除を行うと、変更は通常10秒以内に有効になります。
ポリシーのリストは、コンソールまたはAPIで表示できます。コンソールでは、リストが自動的にフィルタ処理され、表示しているコンパートメントにアタッチされているポリシーのみが表示されます。特定のグループに適用されるポリシーを決定するには、すべてのポリシー内の個々のステートメントを表示する必要があります。その情報をコンソールまたはAPIで自動的に取得する方法はありません。
保有できるポリシーの数については、サービス制限を参照してください。
ポリシー・ビルダーを使用したポリシー・ステートメントの記述
コンソールのポリシー・ビルダーを使用すると、ポリシー・ステートメントを手動で入力することなく、共通ポリシーをすばやく作成できます。ポリシー・ビルダーでは、テナンシ内のユーザーまたはリソースのグループや、ターゲット・リソース(インスタンス、ネットワーク、バケットなど)に管理者が付与できる権限が自動的に提案されます。ポリシー・ビルダーで提案されるポリシーのほとんどは、共通ポリシーでも見つかります(ここで、各ポリシーによって提供されるアクセス権およびそれぞれのユース・ケースの詳細について学習できます)。ポリシー・ビルダーによって提供される提案を必要としないか、より複雑なポリシー要件のあるユーザーは、ビルダーの基本オプションを省略して、拡張エディタに直接進めます。そこでは、フリーフォーム・テキスト・ボックスにポリシー・ステートメントを直接入力できます。
ポリシー・ビルダーの機能
ポリシー・ビルダーには、テナンシのポリシーを作成するために完了できるポリシー・テンプレートが用意されています。ポリシー・テンプレートには、OCIのサービスでタスクまたは一連の関連タスクを実行する権限を付与するために必要なすべてのステートメントが含まれます。テンプレートを完了するには、既存のグループのメニューからグループを選択し、テナンシのコンパートメントのリストから場所を選択します。
ポリシー・ビルダーのポリシー・テンプレートは、ネットワーク管理、ストレージ管理、アカウント管理などのユース・ケース別にグループ化されており、必要な権限セットを簡単に参照および検索できます。
たとえば、テナンシのネットワーク管理者を設定するとします。ネットワーキング・サービス内のすべてのリソースを操作するために必要な権限をユーザーのグループに付与する必要があります。このポリシーをポリシー・ビルダーで作成するには:
- 最初に、必要なポリシーを検索します: 「ポリシー・ユース・ケース」メニューから、「ネットワーク管理」を選択します。ポリシーが属するユース・ケースが不明な場合は、このオプションを「すべて」に設定したまますべてのテンプレートを参照できます。
- 「共通ポリシー・テンプレート」メニューから、「ネットワーク管理者がクラウド・ネットワークを管理できるようにします」を選択します。
ポリシー・ビルダーに、作成されるポリシー・ステートメントが表示されます。この場合、ステートメントは1つのみです:
Allow {group name} to manage virtual-network-family in {location} - ここで必要な操作は、ポリシーのグループおよび場所を選択することのみです。グループを選択すると、表示されたポリシー・ステートメントの{group name}も選択内容で更新されます。
- 最後に、場所を選択します。コンパートメント階層を横断して、適切なコンパートメントを検索および選択できます。テナンシにポリシーを作成するには、ルート・コンパートメントを選択します。

ポリシーのカスタマイズ
テンプレートがニーズに正確に一致しないことがわかった場合は、提供されているポリシーをカスタマイズするために、ステートメントの追加、ステートメントの削除、条件の追加またはその他の変更を行って、必要なポリシーを作成できます。フリーフォーム・テキスト・ボックスでステートメントを編集するには、「カスタマイズ(拡張)」を選択します。テキスト・ボックスにステートメントを直接入力する場合は、ポリシー構文のルールに従ってください。
ネットワーク管理者ポリシーのカスタマイズの例:
- このポリシーに、別のグループGroupBを含める必要があります。グループを追加するには:
「カスタマイズ(拡張)」を選択します。テキスト・ボックスに、(必要な構文に従って)ポリシーに対する変更を入力します。
Allow group GroupA, GroupB to manage virtual-network-family in compartment CompartmentA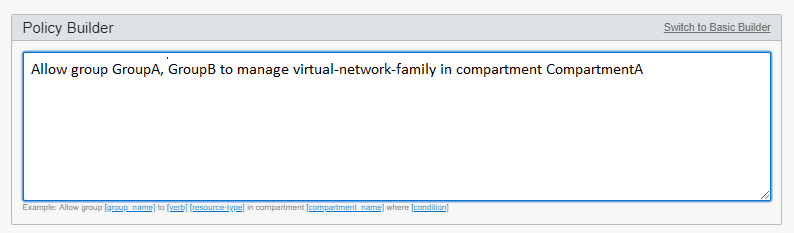
- ステートメントに条件を追加する必要があります。たとえば、MFAによって検証されたユーザーのみがネットワークを管理できるようにします。この条件は、次のようにステートメントに追加できます:
Allow group GroupA to manage virtual-network-family in compartment CompartmentA where request.user.mfaTotpVerified='true'
- ポリシーに別のステートメントを追加する必要があります。たとえば、GroupAにインスタンスの使用を許可します。別のステートメントを追加するには、次の行にそれを入力します:
Allow group GroupA to manage virtual-network-family in compartment CompartmentA Allow group GroupA to use instance-family in compartment CompartmentA 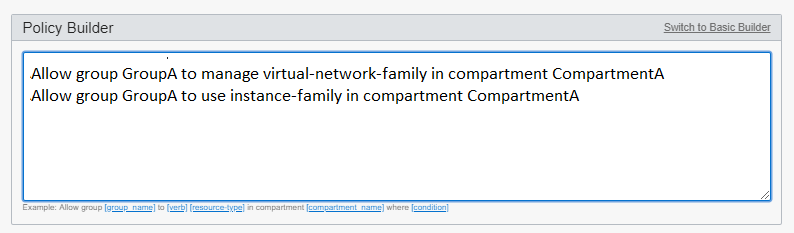
ポリシー・ビルダーを使用したポリシーの編集
ポリシーを作成した後、追加する必要のあるステートメントの変更は、ポリシー・テキストに直接入力できます。テンプレート・セレクタは、新規ポリシーを作成する場合にのみ使用できます。エディタでは、ステートメントの削除、追加、編集または順序変更を行うことができます。
コンソールの使用
前提条件:ポリシーを書き込むグループおよびコンパートメントはすでに存在している必要があります。
- ナビゲーション・メニューを開き、「アイデンティティとセキュリティ」を選択します。「アイデンティティ」にある「ポリシー」を選択します。表示しているコンパートメント内のポリシーのリストが表示されます。
- 「ポリシーの作成」を選択します。
- 次を入力します:
- 名前: ポリシーの一意の名前。この名前は、テナンシ内のすべてのポリシー間で一意である必要があります。これは後で変更できません。機密情報の入力は避けてください。
- 説明: わかりやすい説明。これは必要に応じて後で変更できます。
- コンパートメント: 表示されているコンパートメント以外のコンパートメントにポリシーをアタッチする場合は、リストから選択します。ポリシーがアタッチされている場所によって、後で変更または削除できるユーザーが制御されます(ポリシー・アタッチメントを参照)。
- ポリシー・ビルダーを使用してポリシー・ステートメントを入力します。共通ポリシー・テンプレートから選択する場合は、「基本」オプションを使用します(カスタマイズも可能です)。必要なステートメントの記述方法をすでに理解しており、テキスト・ボックスに入力するだけでよい場合は、「カスタマイズ(拡張)」オプションを使用します。ポリシー・ビルダーの「基本」オプションを使用するには:
- ポリシー・テンプレートのリストをフィルタするには、「ポリシー・ユース・ケース」メニューから選択します。どのユース・ケースを選択すればよいかわからない場合は、「共通ポリシー・テンプレート」リストのすべてのテンプレートを参照できます。
- 「共通ポリシー・テンプレート」リストから、要件に最も適合するテンプレートを選択します。
ポリシー・ビルダーに、選択したポリシーの説明が表示され、それに含まれるポリシー・ステートメントがリストされます。
- このポリシーを適用するグループを選択します。
- 場所を選択します。場所は、このポリシーでアクセス権を付与するコンパートメントです。ここで選択するコンパートメントは、ステップ3でポリシーをアタッチするために選択したコンパートメントか、そのコンパートメントの階層内のコンパートメントである必要があります。
- ポリシー・ステートメントを変更する必要がある場合は、「カスタマイズ(拡張)」」を選択します。
「カスタマイズ(拡張)」オプションを使用するには:- 「カスタマイズ(拡張)」を選択します。
- ポリシー構文で説明されているフォーマットに従ってポリシー・ステートメントを入力または編集します(1行に1つのステートメントを入力します)。
- このポリシーにタグを追加するには、「拡張オプションの表示」を選択します。リソースの作成権限がある場合は、フリーフォーム・タグをそのリソースに適用する権限もあります。定義済タグを適用するには、タグ・ネームスペースを使用する権限が必要です。タグ付けの詳細は、リソース・タグを参照してください。タグを適用するかどうかがわからない場合は、このオプションをスキップするか、管理者に問い合せてください。タグは後で適用できます。
- 別のポリシーを作成する場合は、「別のポリシーの作成」を選択します。
- 「作成」を選択します。
新しいポリシーは、通常は10秒以内に有効になります。
ナビゲーション・メニューを開き、「アイデンティティとセキュリティ」を選択します。「アイデンティティ」にある「ポリシー」を選択します。現在表示しているコンパートメント内のポリシーのリストが表示されます。別のコンパートメントにアタッチされているポリシーを表示する場合は、左側のリストからそのコンパートメントを選択します。すべてのポリシーの単一リストを取得することはできません。これらは常にコンパートメント別に表示されます。
特定のグループに適用されるポリシーを決定するには、すべてのポリシー内の個々のステートメントを表示する必要があります。その情報をコンソールで自動的に取得する方法はありません。
APIでのみ使用可能です。回避策は、新しい説明を使用して新しいポリシーを作成し、古いポリシーを削除することです。
- ナビゲーション・メニューを開き、「アイデンティティとセキュリティ」を選択します。「アイデンティティ」にある「ポリシー」を選択します。表示しているコンパートメント内のポリシーのリストが表示されます。探しているポリシーが表示されない場合は、正しいコンパートメントが表示されていることを確認します。別のコンパートメントにアタッチされたポリシーを表示するには、「リスト範囲」で、リストからそのコンパートメントを選択します。
- 更新するポリシーを選択します。ポリシーの詳細およびステートメントが表示されます。
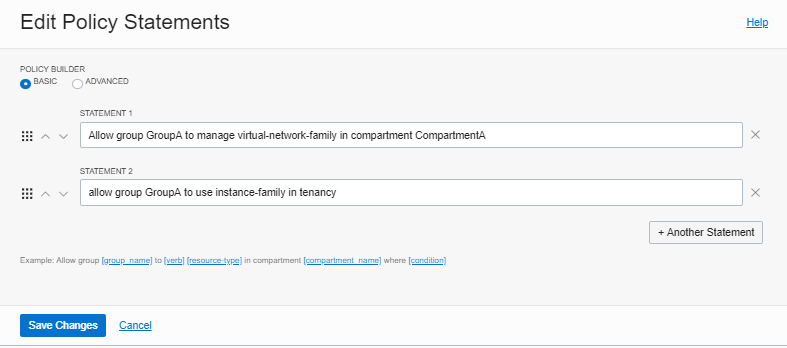
- 「ポリシー・ステートメントの編集」を選択します。グラフィカル・コントロールを使用してステートメントと対話する場合は、基本ポリシー・ビルダー・オプションを使用します。単純なテキスト・ボックスでステートメントを編集するには、拡張 ポリシー・ビルダー・オプションを使用します。
基本オプションを使用するには:
拡張オプションを使用するには: - 編集が終了したら、「変更の保存」を選択します。
変更は、通常10秒以内に有効になります。
- ナビゲーション・メニューを開き、「アイデンティティとセキュリティ」を選択します。「アイデンティティ」にある「ポリシー」を選択します。表示しているコンパートメント内のポリシーのリストが表示されます。探しているポリシーが表示されない場合は、正しいコンパートメントが表示されていることを確認します。別のコンパートメントにアタッチされたポリシーを表示するには、「リスト範囲」で、リストからそのコンパートメントを選択します。
- 削除するポリシーの「削除」を選択します。
- プロンプトが表示されたら確認します。
変更は、通常10秒以内に有効になります。
APIの使用
APIの使用およびリクエストの署名の詳細は、REST APIのドキュメントおよびセキュリティ資格証明を参照してください。SDKの詳細は、SDKおよびCLIを参照してください。
すべてのリージョンで更新が即時ではない
IAMリソースはホーム・リージョンにあります。すべてのリージョンにわたってポリシーを施行するために、IAMサービスは各リージョンにリソースをレプリケートします。ポリシー、ユーザーまたはグループを作成または変更するたびに、変更はホーム・リージョンの最初に有効になり、その後他のリージョンに伝播されます。変更がすべてのリージョンで有効になるまでに、数分かかることがあります。たとえば、テナンシ内でインスタンスを起動する権限を持つグループがあるとします。このグループにUserAを追加すると、UserAでは1分以内にホーム・リージョンのインスタンスを起動できます。ただし、UserAは、レプリケーション・プロセスが完了するまで、他のリージョンでインスタンスを起動できません。このプロセスには最大で数分かかります。レプリケーションが完了する前にUserAがインスタンスを起動しようとすると、認可されていないエラーが発生します。
ポリシーを管理するには、次のAPI操作を使用します。