Scheduling Data Science Job Runs

In this tutorial, you use Data Integration to schedule job runs for your Data Science jobs.

Key tasks include how to:

  • Create a job with a Data Science job artifact.
  • Set up a REST task to create a job with the same specifics as the job created with the artifact.
  • Set up a schedule and assign it to the REST task.
  • Have the task scheduler create the Data Science jobs.
A diagram of a user connected from a local machine to an Oracle Cloud Infrastructure compartment called data-science-work compartment. The user creates a job artifact, hello_world_job.py, and sends the job to a Data Science project. The Data Science project is called DS Project and the job is called, hello_world_job. In another workflow, from a Data Integration workspace called hello_world_workspace, a hello_world_REST_task is published to the Scheduler Application of the workspace. Scheduler Application contains  hello_world_task_schedule that sends hello_world_job instances to the DS Project. The hello_world_task_schedule contains a hello_world_task and a hello_world_schedule, suggesting that the schedule for the task comes from the  hello_world_schedule. The DS Project displays scheduled job runs coming from the Scheduler application, called HELLO WORLD JOB RUN.

1. Prepare

Create and set up dynamic groups, policies, a compartment, and a Data Science project for your tutorial.

Set Up Resources

Perform the Manually Configuring a Data Science Tenancy tutorial with the following specifics:

Note

If you have performed the Manually Configuring a Data Science Tenancy before, ensure that you read the next steps and incorporate the policies that apply to this tutorial.
  1. Perform all the steps in Step 1. Creating a User Group, and name your group, data-scientists.
  2. Perform all the steps in Step 2. Creating a Compartment, and name the compartment for your work data-science-work.
  3. From the detail page of data-science-work compartment, copy the <data-science-work-compartment-ocid>.
  4. Follow all the steps in Step 3. Creating a VCN and Subnet. This step is required for this tutorial. In the data-science-work compartment, use the wizard to create a VCN with the name, datascience-vcn.
  5. In Step 4. Creating Policies, create a policy in the data-science-work compartment called data-science-policy, and only add the following policies:
    allow group data-scientists to manage all-resources in compartment data-science-work 
    allow service datascience to use virtual-network-family in compartment data-science-work

    The first policy gives you administrative rights to your compartment, in which you can manage all the resources of OCI services.

  6. In Step 5. Creating a Dynamic Group with Policies, create a dynamic group called data-science-dynamic-group with the following three matching rules:
    Replace <data-science-work-compartment-ocid> with the OCID that you copied in step 3.
    ALL {resource.type='datasciencenotebooksession', resource.compartment.id='<data-science-work-compartment-ocid>'}
    ALL {resource.type='datasciencemodeldeployment', resource.compartment.id='<data-science-work-compartment-ocid>'}
    ALL {resource.type='datasciencejobrun', resource.compartment.id='<data-science-work-compartment-ocid>'}
    Note

    You only need the last matching rule for the datasciencejobrun resource used in this tutorial. Add the other Data Science resources to be prepared for working with notebook sessions and model deployments.
  7. For Step 5, create a policy called data-science-dynamic-group-policy in the root (tenancy) compartment. Click Show manual editor and add the following policies for the data-science-dynamic-group:
    allow dynamic-group data-science-dynamic-group to manage all-resources in compartment data-science-work
    allow dynamic-group data-science-dynamic-group to read compartments in tenancy
    allow dynamic-group data-science-dynamic-group to read users in tenancy
  8. For Step 6. Creating a Notebook Session, create a project in the data-science-work compartment called DS Project and skip creating a notebook session.
    Note

    In this tutorial, you name your Data Science project, DS Project, and later you name your Data Integration project DI Project. Don't name your project Initial Project as you are instructed in Step 6.
Add Data Integration Policy

Allow the Data Integration service to create workspaces.

  1. Open the navigation menu and click Identity & Security. Under Identity, click Policies.
  2. In the left navigation, under List Scope, click data-science-work for the compartment.
  3. Click data-science-policy that you created in the Set Up Resources step.
  4. Click Edit Policy Statements.
  5. Click Advanced.
  6. In a new line, add the following statement:
    allow service dataintegration to use virtual-network-family in compartment data-science-work
  7. Click Save Changes.
    Note

    The preceding policy allows the Create workspace dialog of the Data Integration service to list the VCNs in the data-science-work compartment, allowing you to assign a VCN to your workspace when you create it. The workspace then uses this VCN for its resources.
Add Data Integration to Dynamic Group

In this step, you add Data Integration workspaces to the data-science-dynamic-group. The data-science-dynamic-group-policy allows all members of this dynamic group to manage the data-science-family. This way, the workspace resources such tasks schedules can create your Data Science jobs.

  1. Open the navigation menu and click Identity & Security. Under Identity, click Dynamic Groups.
  2. In the list of Dynamic Groups, click the data-science-dynamic-group that you created in the Set Up Resources step.
  3. Click Edit All Matching Rules.
  4. Add the following matching rule:
    ALL {resource.type='disworkspace', resource.compartment.id='<data-science-work-compartment-ocid>'}

    Replace <data-science-work-compartment-ocid> with the OCID for datascience-work compartment.

    Tip

    You can copy the <data-science-work-compartment-ocid> from another rule in the data-science-dynamic-group matching rules, because they all point to the datascience-work compartment.

    The preceding matching rule means that all Data Integration workspaces created in your compartment are added to data-science-dynamic-group. The data-science-dynamic-group-policy created for data-science-dynamic-group now applies to the workspaces in this compartment.

2. Set Up a Job Run

Create a Job Artifact

Create a hello world Python job artifact to use in your job and job runs:

  1. Copy the following Python code into a text file.
    # simple job
    print("Hello world job!")
  2. Save the code as hello_world_job.py on your local machine.
Create a Job

Create a job with the hello world job artifact:

  1. Open the navigation menu and click Analytics and AI. Under Machine Learning, click Data Science.
  2. Click data-science-work for the compartment.
  3. Click the DS Project you created in the Set Up Resources section of this tutorial.
  4. Click Jobs.
  5. Click Create job.
  6. Set up the following options:
    • Name: hello_world_job
    • Upload job artifact: The hello_world_job.py file from Create a Job Artifact section.
    • Default configuration: skip
    • Compute shape:
      • Fast launch
      • VM.Standard2.1
    • Logging: skip
    • Storage: 50
    • Networking resources: Default networking
  7. Click Create.
Reference: Creating Jobs
Start a Job Run

Run the hello_world_job:

When you create a job, you set the infrastructure and artifacts for the job. Then you create a job run that provisions the infrastructure, runs the job artifact, and when the job ends, deprovisions and destroys the used resources.

  1. In the hello_world_job page, click Start a job run.
  2. Select the data-science-work compartment.
  3. Name the job run, hello_world_job_run_test.
  4. Skip the Logging configuration override and Job configuration override sections.
  5. Click Start.
  6. In the trail that displays the current page, which is now the job run details page, click Job runs to go back and get the list of job runs.
  7. For the hello_world_job_run_test, wait for the Status to change from Accepted to In Progress, and finally to Succeeded before you go to the next step.
Reference: Starting Job Runs
Gather Job Info

To use the hello_world_job for scheduling, you need to prepare some information about the job:

  1. Collect the following information from the Oracle Cloud Infrastructure Console and copy them into your notepad.
    • jobId: <data-science-hello-world-job-ocid>
      • In Data Science, go to the details page of hello_world_job and copy the OCID.
      • The OCID starts with ocid1.datasciencejob.
    • projectId: <data-science-project-ocid>
      • In Data Science, from the hello_world_job Job details page, go back to Jobs and copy the DS Project OCID.
      • The OCID starts with ocid1.datascienceproject.

    • compartmentId: <data-science-work-compartment-ocid>
      • Get the OCID from the Set Up Resources section.
      • The OCID starts with ocid1.compartment.

  2. Region: <region-identifier>
    • From the Console's top navigation bar, find your region. For example, US West (Phoenix).
    • Find your region's <region-identifier> from Regions and Availability Domains. Example: us-phoenix-1.

3. Set Up the Task

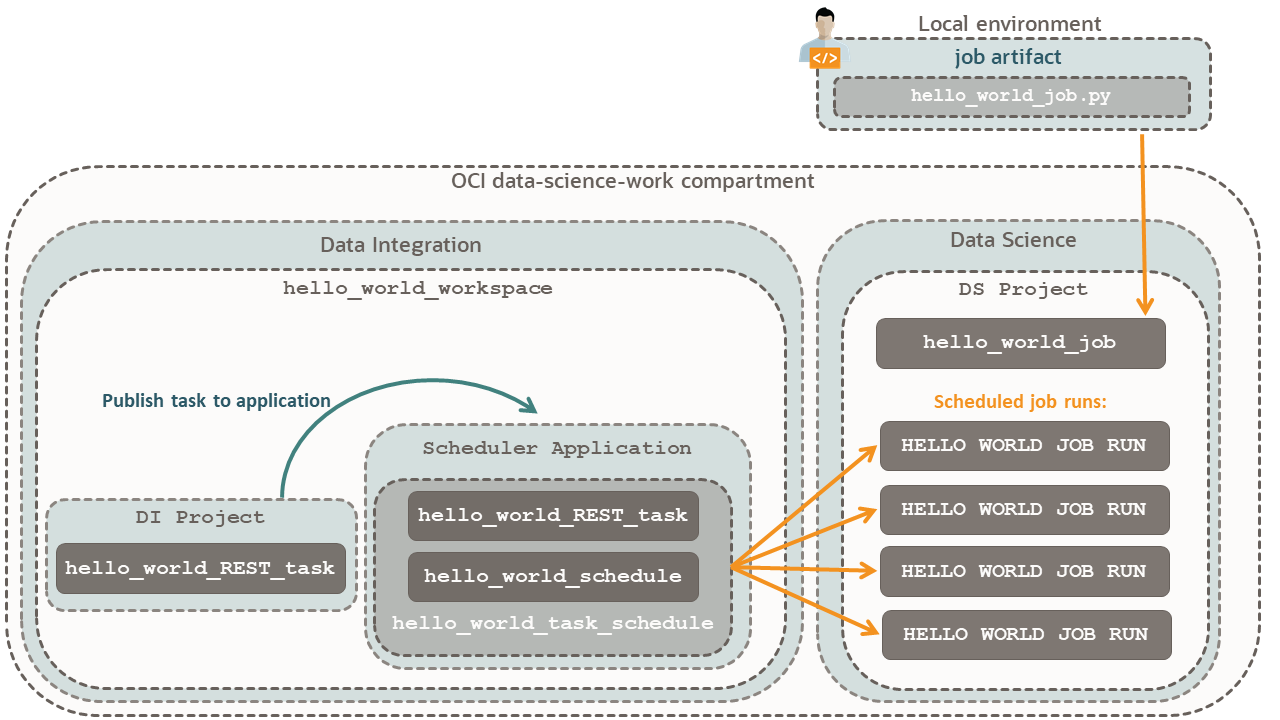
For a visual relationship of the components, refer to the scheduler diagram.

Create a Workspace

Create a workspace to host a project with a task that creates job runs.

  1. Open the navigation menu and click Analytics and AI. Under Data Lake, click Data Integration.
  2. Click Workspaces.
  3. Click data-science-work for the compartment.
  4. Click Create workspace.
  5. Skip the optional inputs and set up the following options:
    • Name: hello_world_workspace
    • Network selection:
      • Enable private network: selected
      • VCN: The datascience-vcn network that you created in the Set Up Resources section.
      • subnet: Private Subnet-datascience-vcn
  6. Click Create.

    After the workspace is Active, go to the next step.

Reference: Creating Workspaces
Note

This workspace uses datascience-vcn, and the Data Science job that you created uses the Default networking option that Data Science offers. Because you have given the Data Integration service access to all resources in the data-science-work compartment, it doesn't matter that the VCNs differ. Data Integration has a scheduler in datascience-vcn, creating job runs in the Default networking VCN.
Update Project Name

In the hello_world_workspace, update the system-generated project name.

  1. In the workspace, hello_world_workspace, Click the system-generated project, My First Project.
  2. Click Edit.
  3. Change the name of the project from My First Project to DI Project.
  4. For Description, enter:
    Data Integration project to host the hello_world_REST_task.
  5. Click Save changes.
Note

You change the project name to be clear that this project is a Data Integration project, and not a Data Science project.
Create a REST Task in the Workspace

Create a task and define the REST API parameters for creating a job run.

  1. In the trail that displays the current page, go back to the hello_world_workspace workspace.
  2. In the Quick actions panel of the hello_world_workspace, click Create REST task.
  3. Name the task, hello_world_REST_task.
  4. For Project or Folder, select DI Project.
  5. Configure your REST API details:
    • HTTP method: POST
    • URL: Find the API endpoint and path for your URL:
      • From the Data Science API, copy the API endpoint for your region. The endpoint must include the <region-identifier> you copied in the Gather Job Info section.
        https://datascience.<region-identifier>.oci.oraclecloud.com
      • From POST /<REST_API_version>/jobRuns, copy the POST command for CreateJobRun.
        /<REST_API_version>/jobRuns
      • Put the two sections together:
        https://datascience.<region-identifier>.oci.oraclecloud.com/<REST_API_version>/jobRuns
        Example:
        https://datascience.us-phoenix-1.oci.oraclecloud.com/20190101/jobRuns
    • Request: Click the Request link to activate it and then construct the body with the following attributes from CreateJobRunDetails Reference:
      {
          "projectId": "<data-science-project-ocid>",
          "compartmentId": "<data-science-work-compartment-ocid>",
          "jobId": "<data-science-hello-world-job-ocid>",
          "definedTags": {},
          "displayName": "HELLO WORLD JOB RUN",
          "freeformTags": {},
          "jobConfigurationOverrideDetails": {
          "jobType": "DEFAULT"
          }
      }

      In the Request body, replace the fields with brackets with the information from the Gather Job Info section.

      Example:

      {
          "projectId": "ocid1.datascienceproject.oc1....",
          "compartmentId": "ocid1.compartment.oc1.....",
          "jobId": "ocid1.datasciencejob.oc1....",
          "definedTags": {},
          "displayName": "HELLO WORLD JOB RUN",
          "freeformTags": {},
          "jobConfigurationOverrideDetails": {
          "jobType": "DEFAULT"
          }
      }
    • Click Next, review the default conditions, and keep their default options:

      Success condition: SYS.RESPONSE_STATUS >= 200 AND SYS.RESPONSE_STATUS < 300

  6. Click Configure.
  7. For Authentication, Configure the following options:
    • Authentication: OCI resource principal
    • Authentication source: Workspace
  8. Click Configure.
  9. Skip configuring the Parameters (Optional) panel.
  10. Click Validate task.
  11. After you get Validation: Successful, click Create.

After the workspace shows that REST task created successfully, click Save and Close.

Note

In the Request body of your REST task, you assign values to the parameters needed for creating a job run. You use the same values as the hello_world_job you created in Data Science in the Create a Job section of this tutorial.

References:

Create an Application

Create a scheduler application that runs your REST task on a schedule.

  1. In the hello_world_workspace workspace, in the Quick actions panel, click Create application.
  2. Name the application, Scheduler Application.
  3. Click Create.
Add REST Task to Application

Add the hello_world_REST_task to the Scheduler Application:

  1. In the trail that displays the current page, navigate to the hello_world_workspace workspace and the click the Projects link.
  2. Click DI Project.
  3. Click Tasks.
  4. In the list of Tasks, click the Actions menu (three dots) for hello_world_REST_task and then click Publish to application.
  5. For Application name, click Scheduler Application.
  6. Click Publish.
Run the Task

Before you schedule the hello_world_REST_task, test the task by manually running it:

  1. In the hello_world_workspace workspace, click the Applications link.
  2. Click Scheduler Application.
  3. To confirm that the task is published, see if the hello_world_REST_task is listed in the tasks for this application.
  4. In the list of tasks, click the Actions menu (three dots) for hello_world_REST_task, and then click Run.
  5. In the list of Runs, click the latest run, hello_world_REST_task_<id>.

    Example:

    hello_world_REST_task_1651261399967_54652479

  6. Wait for the status of your run to change from Not Started to Success.
    Note

    Troubleshooting
    • If you get an Error status, go back to your project, and check the URL and the request body of your REST task, including the OCIDs that you assigned to the REST task. Then:
      1. Update the hello_world_REST_task URL or the request body with your fixes.
      2. Unpublish and publish the hello_world_REST_task.
      3. Repeat all the steps in this section.
Check the Job Run

Check that the Data Science Job runs displays the task you ran from Data Integration.

  1. Open the navigation menu and click Analytics and AI. Under Machine Learning, click Data Science.
  2. Select the data-science-work compartment.
  3. Click the DS Project you created in the Set Up Resources section.
  4. Click Jobs.
  5. Click hello_world_job.
  6. Find the HELLO WORLD JOB RUN in the list of job runs.
    HELLO WORLD JOB RUN is what you named your job run when you set up hello_world_REST_task.
  7. Wait for the status to change from Accepted, to In progress, and finally to Succeeded.
Reference: Starting Job Runs

4. Schedule and Run the Task

Create a schedule to run the published hello_world_REST_task.

Create a Schedule
  1. Open the navigation menu and click Analytics and AI. Under Data Lake, click Data Integration.
  2. Click Workspaces.
  3. Select the data-science-work compartment.
  4. Click the hello_world_workspace.
  5. Click Applications and then Scheduler Application.
  6. In the left navigation panel, click Schedules.
  7. Click Create schedule.
  8. Set up the following options:
    • Name: hello_world_schedule
    • Identifier: HELLO_WORLD_SCHEDULE
    • Time Zone: UTC

      Ensure that you keep the default value of universal time zone:

      (UTC+00:00) Coordinated Universal Time (UTC)

    • Frequency: Hourly
      • Repeat every: 1 (1 hour)
      • Minutes: 0
      • Summary: At 0 minutes past every hour
      Tip

      Check your time and change the Minutes: to 5 minutes after your current time. For example, if your current time is 11:15, change Minutes to 20. This way, you don't have to wait 45 minutes to see the job run. This tutorial uses zero minutes for the next sections.
  9. Click Create.
Note

  • In this step, you set up a schedule in the Scheduler Application. In the next step, you associate the schedule with the hello_world_REST_task.

Reference: Scheduling Published Tasks

Schedule the Task

Assign the hello_world_schedule to the published hello_world_REST_task:

  1. In the hello_world_workspace, click Applications and then Scheduler Application.
  2. In the left navigation panel, click Tasks.
  3. Click hello_world_REST_task.
  4. Click Create task schedule.
  5. Set up the following options:
    • Name: hello_world_REST_task_schedule
    • Identifier: HELLO_WORLD_REST_TASK_SCHEDULE
    • Description: Assign the hello_world_schedule to the published hello_world_REST_task.
    • Enable task schedule: selected

      The Enable option starts the scheduler as soon as you create or save the task schedule.

    • Schedule: Select hello_world_scheduleand then click Select to go back to the previous screen.
    • Skip configuring the Configure task schedule section.
  6. Click Create and close.
Check the Task Runs
  1. In the list of Task schedules, click the hello_world_REST_task_schedule you created in the Schedule the Task section.
  2. In the task schedule details, find the value for the Next runfield.
    Example,

    Example: Next run: Mon, Sep 19, 2022, 22:40:00 UTC

  3. Translate the time for the Next run from UTC time zone to your time zone.
  4. After you reach the run time indicated in the Next run, click Refresh until the Runs section displays a run.
    Example: hello_world_REST_task_schedule_<some-id>
Check the Job Runs

Check that the Data Science Job runs displays the scheduled task from Data Integration.

  1. Open the navigation menu and click Analytics and AI. Under Machine Learning, click Data Science.
  2. Select the data-science-work compartment.
  3. Click the DS Project you created in the Prepare section of this tutorial.
  4. In the left navigation panel, click Jobs.
  5. Click hello_world_job.
  6. In the list of Job runs, wait for the HELLO WORLD JOB RUN instance to list with the scheduled date.
  7. Click HELLO_WORLD_JOB_RUN.
  8. Copy the value for Created by in a notepad.

    Example: ocid1.disworkspace.oc1.phx....

  9. Open the navigation menu and click Analytics and AI. Under Data Lake, click Data Integration.
  10. Click Workspaces.
  11. In the list of workspaces, click the Actions menu (three dots) for hello_world_workspace.
  12. Click Copy OCID, and copy the workspace OCID and compare it with the value you copied for Created by, in step 8.
    The two OCIDs are the same.
    Note

    The creator of the jobs is the OCID of the Data Integration workspace, hello_world_workspace.
  13. (Optional) Engage yourself with other tasks, and then come back in an hour for the next job run.
    Note

    If you want run jobs that are less than an hour apart, then create several hourly schedules with different minutes. For example, for the schedules to be 15 minutes apart, create four hourly schedules: minute-0, minute-15, minute-30, and minute-45. Then, for the hello_world_REST_task, create a task schedule for each schedule. For example, a task schedule for the minute-15 schedule, another task schedule for the minute-30 schedule.
Stop the Job Runs

After you receive one or more jobs runs, you are done with this tutorial. You can now disable the scheduler and stop new job runs.

  1. In the hello_world_workspace, click Applications and then Scheduler Application.
  2. In the left navigation panel, click Tasks.
  3. Click hello_world_REST_task.
  4. In the list of task schedules, click hello_world_REST_task_schedule.
  5. Click Disable.
  6. In the confirmation dialog, click Disable.
  7. If you created more than one task schedule for this tutorial, then disable all of them.