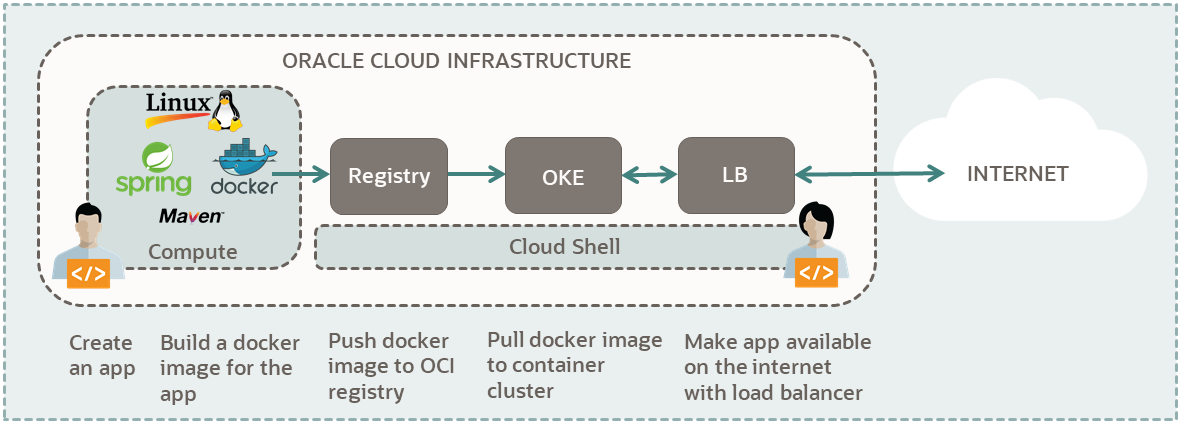
Kubernetes Using Cloud Shell: Deploy a Spring Boot Application

In this tutorial, you use an Oracle Cloud Infrastructure account to set up a Kubernetes cluster. Then, you deploy a Spring Boot application to your cluster.

Key tasks include how to:

  • Create a compartment.
  • Set up a Kubernetes cluster on OCI.
  • Build a Spring Boot application and Docker image.
  • Push your image to OCI Container Registry.
  • Deploy your Docker application to your cluster using Cloud Shell.
  • Connect to your application from the internet.
A diagram of the components needed to run a Spring Boot app on Oracle Cloud Infrastructure Container Engine

For additional information, see:

Before You Begin

To successfully perform this tutorial, you must have the following:

Requirements
  • A paid Oracle Cloud Infrastructure account. See Signing Up for Oracle Cloud Infrastructure.
  • Cloud Shell provides the following applications:
    • JDK 8+
    • Python 3.6.8+
    • Kubectl 1.18.10+
    • Apache Maven 3.5+
    • Docker 19.0.11+
Note

The advantage of using Cloud Shell is all the required tools to manage your application are already installed and ready to use.

1. Prepare

Prepare your environment to create and deploy your application.

Check your Service Limits
  1. Log in to the Oracle Cloud Infrastructure Console.
  2. Open the navigation menu, and click Governance and Administration. Under Governance, click Limits, Quotas and Usage.
  3. Find your service limit for Regions:
    • Filter for the following options:
      • Service: Regions
      • Scope: Tenancy
      • Resource: Subscribed region count
      • Compartment: <tenancy-name> (root)
    • Find service limit:
      • Limit Name: subscribed-region-count
      • Service Limit: minimum 2
  4. Find your available Compute core count for the VM.Standard.E3.Flex shape:
    • Filter for the following options:
      • Service: Compute
      • Scope: <first-availability-domain>. Example: EMlr:US-ASHBURN-AD-1
      • Resource: Cores for Standard.E3.Flex and BM.Standard.E3.128 Instances
      • Compartment: <tenancy-name> (root)
    • Find available core count:
      • Limit Name: standard-e3-core-ad-count
      • Available: minimum 1
    • Repeat for Scope: <second-availability-domain> and <third-availability-domain>. Each region must have at least one core available for this shape.
  5. Find out if you have 50 GB of Block Volume available:
    • Filter for the following options:
      • Service: Block Volume
      • Scope: <first-availability-domain>. Example: EMlr:US-ASHBURN-AD-1
      • Resource Volume Size (GB)
      • Compartment: <tenancy-name> (root)
    • Find available core count:
      • Limit Name: total-storage-gb
      • Available: minimum 50
    • Repeat for Scope: <second-availability-domain> and <third-availability-domain>. Each region must have at least 50 GB of block volume available.
  6. Find out how many Flexible Load Balancers you have available:
    • Filter for the following options:
      • Service: LbaaS
      • Scope: <your-region>. Example: us-ashburn-1
      • Resource: <blank>
      • Compartment: <tenancy-name> (root)
    • Find the count for the following shapes
      • Limit Name: lb-flexible-bandwidth-count
      • Available: minimum 1
Note

This tutorial creates three compute instances with a VM.Standard.E2.1 shape for the cluster nodes. To use another shape, filter for its core count. For example, for VM.Standard2.4, filter for Cores for Standard2 based VM and BM Instances and get the count.

For a list of all shapes, see VM Standard Shapes.

Note

This tutorial creates three compute instances with a VM.Standard.E3.Flex shape for the cluster nodes. To use another shape, filter for its core count. For example, for VM.Standard2.4, filter for Cores for Standard2 based VM and BM Instances and get the count.

For a list of all shapes, see VM Standard Shapes.

Note

This tutorial uses a 'Quick Create' workflow to create a cluster with a public regional subnet that hosts a flexible load balancer. To use a different load balancer, you can use a custom workflow to explicitly specify which existing network resources to use, including the existing subnets in which to create the load balancers.

To use another bandwidth for the load balancer, filter for its count, for example 100-Mbps bandwidth or 400-Mbps bandwidth.

Create an Authorization Token
  1. In the Console's top navigation bar, click the Profile menu (your avatar).
  2. Click your username.
  3. Click Auth Tokens.
  4. Click Generate Token.
  5. Give it a description.
  6. Click Generate Token.
  7. Copy the token and save it.
  8. Click Close.
Note

Ensure that you save your token right after you create it. You have no access to it later.
Gather Required Information
  1. Collect the following credential information from the Oracle Cloud Infrastructure Console.
    • Tenancy name: <tenancy-name>
      • Click your Profile menu (your avatar) and find your Tenancy:<tenancy-name>.
    • Tenancy namespace: <tenancy-namespace>
      • Click your Profile menu (your avatar).
      • Click Tenancy: <tenancy-name>.
      • Copy the value for Object Storage Namespace.
      Note

      For some accounts, tenancy name and namespace differ. Ensure that you use namespace in this tutorial.
    • Tenancy OCID: <tenancy-ocid>
      • Click your Profile menu (your avatar), then click Tenancy:<tenancy-name>, and copy OCID.
    • Username: <user-name>
      • Click your Profile menu (your avatar).
    • User OCID: <user-ocid>
      • Click your Profile menu (your avatar), then click User Settings, and copy OCID.
  2. Find your region information.
    • Region: <region-identifier>
      • In the Console's top navigation bar, find your region. Example: US East (Ashburn).
      • Find your Region Identifier from the table in Regions and Availability Domains.
      • Example: us-ashburn-1.
    • Region Key: <region-key>
  3. Copy your authentication token from Create an Authentication Token section.
    • Auth Token: <auth-token>

2. Set Up a Cluster

Install and configure management options for your Kubernetes cluster. Later, deploy your application to this cluster.

Add Compartment Policy

If your username is in the Administrators group, then skip this section. Otherwise, have your administrator add the following policy to your tenancy:

allow group <the-group-your-username-belongs> to manage compartments in tenancy

With this privilege, you can create a compartment for all the resources in your tutorial.

Steps to Add the Policy
  1. In the Console's top navigation bar, open the Profile menu (your avatar).
  2. Click your username.
  3. In the left pane, click Groups.
  4. In a notepad, copy the Group Name that your username belongs.
  5. Open the navigation menu and click Identity & Security. Under Identity, click Policies.
  6. Click Create Policy.
  7. Fill in the following information:
    • Name: manage-compartments
    • Description: Allow the group <the-group-your-username-belongs> to list, create, update, delete and recover compartments in the tenancy.
    • Compartment: <your-tenancy>(root)
  8. For Policy Builder, click Show manual editor.
  9. Paste in the following policy:
    allow group <the-group-your-username-belongs> to manage compartments in tenancy
  10. Click Create.

Reference

The compartments resource-type in Verbs + Resource-Type Combinations for IAM

Create a Compartment

Create a compartment for the resources that you create in this tutorial.

  1. Log in to the Oracle Cloud Infrastructure Console.
  2. Open the navigation menu and click Identity & Security. Under Identity, click Compartments.
  3. Click Create Compartment.
  4. Fill in the following information:
    • Name: <your-compartment-name>
    • Description: Compartment for <your-description>.
    • Parent Compartment: <your-tenancy>(root)
  5. Click Create Compartment.

Reference: Create a compartment

Add Resource Policy

If your username is in the Administrators group, then skip this section. Otherwise, have your administrator add the following policy to your tenancy:

allow group <the-group-your-username-belongs> to manage all-resources in compartment <your-compartment-name>

With this privilege, you can manage all the resources in your compartment, essentially giving you administrative rights in that compartment.

Steps to Add the Policy
  1. Open the navigation menu and click Identity & Security. Under Identity, click Policies.
  2. Select your compartment from the Compartment list.
  3. Click Create Policy.
  4. Fill in the following information:
    • Name: manage-<your-compartment-name>-resources
    • Description: Allow users to list, create, update, and delete resources in <your-compartment-name>.
    • Compartment: <your-tenancy>(root)
  5. For Policy Builder, select the following choices:
    • Policy use cases: Compartment Management
    • Common policy templates: Let compartment admins manage the compartment
    • Groups: <the-group-your-username-belongs>
    • Location: <your-tenancy>(root)
  6. Click Create.

Reference

Common Policies

Create a Cluster with 'Quick Create'

Create a cluster with default settings and new network resources through the 'Quick Create' workflow.

  1. Sign in to the Oracle Cloud Infrastructure Console.
  2. Open the navigation menu and click Developer Services. Under Containers & Artifacts, click Kubernetes Clusters (OKE).
  3. Click Create Cluster.
  4. Select Quick Create.
  5. Click Launch Workflow.

    The Quick Create Cluster dialog is displayed.

  6. Fill in the following information.
    • Name: <your-cluster-name>
    • Compartment: <your-compartment-name>
    • Kubernetes Version: <take-default>
    • Kubernetes API Endpoint: Public Endpoint

      The Kubernetes cluster is hosted in a public subnet with an auto-assigned public IP address.

    • Kubernetes Worker Nodes: Private Workers

      The Kubernetes worker nodes are hosted in a private subnet.

    • Shape: VM.Standard.E3.Flex
    • Select the number of OCPUs: 1
    • Amount of Memory (GB): 16
    • Number of Nodes: 3
    • Network Bandwidth: 1.0 (This value is calculated by OCPU count.)
    • Max Total VNICs: 2 (This value is calculated by OCPU count.)
  7. Click Show Advanced Options.

    Keep the defaults.

    • Specify a custom boot volume size: Clear the check box.
    • Image Verification: Clear the check box.
    • Add an SSH key: No SSH key
  8. Click Next.

    All your choices are displayed. Review them to ensure that everything is configured correctly.

  9. Click Create Cluster.

    The services set up for your cluster are displayed.

  10. Click Close.
  11. Get a cup of coffee. It takes a few minutes for the cluster to be created.
You have successfully created a Kubernetes cluster.
Configure Cloud Shell to Access to Your Cluster

After you create a Kubernetes cluster, set up Cloud Shell to access the cluster.

  1. Sign in to the Oracle Cloud Infrastructure Console.
  2. Open the navigation menu and click Developer Services. Under Containers & Artifacts, click Kubernetes Clusters (OKE).
  3. Click the link to <your-cluster>.

    The information about your cluster is displayed.

  4. Click Access Cluster.
  5. Click Cloud Shell Access. Follow the steps in the dialog. The following steps are provided for your reference.
  6. Click Launch Cloud Shell. Alternatively, from the main menu, you can click the Cloud Shell icon (cloud-shell-icon) and start a session.
  7. Check your oci CLI version and verify that Cloud Shell is working.
    oci -v
  8. Create kubeconfig file for your setup. Use the information from Access Your Cluster dialog.
    oci ce cluster create-kubeconfig <use data from dialog>
    You get a message that:
    New config written to the Kubeconfig file <your-home-directory>/.kube/config
    Note

    If the config file is not stored in its default location (~/.kube/config, you must export the KUBECONFIG environment variable to point to the location.
    export KUBECONFIG=$HOME/<new-location>/config
    Note

    When working with more than one cluster, you specify a specific config file on the command line. Example:
    kubectl --kubeconfig=</path/to/config/file> <some-command>
  9. Test your cluster configuration with the following command.

    List clusters:

    kubectl get service

With your cluster access setup, you are now ready to prepare your application for deployment.

3. Build your Docker Application

Build a local application and a Docker image for the application.

Create a Local Application
  1. Check out the Spring Boot Docker guide with Git:
    git clone https://github.com/spring-guides/gs-spring-boot-docker.git
  2. Change into the gs-spring-boot-docker/initial directory.
    cd gs-spring-boot-docker/initial
  3. Change into the Java source directory: src/main/java/hello.
    cd src/main/java/hello
  4. Update Application.java with the following code:
    package hello;
                            
    import org.springframework.boot.SpringApplication;
    import org.springframework.boot.autoconfigure.SpringBootApplication;
    import org.springframework.web.bind.annotation.RequestMapping;
    import org.springframework.web.bind.annotation.RestController;
    
    @SpringBootApplication
    @RestController
    public class Application {
    	
    	@RequestMapping("/")
    	public String home() {
    		return "<h1>Spring Boot Hello World!</h1>";
    	}
    
    	public static void main(String[] args) {
    		SpringApplication.run(Application.class, args);
    	}
    
    }
  5. Save the file.
Run the Local Application
  1. Change into the gs-spring-boot-docker/initial directory.
  2. Package the app:
    mvn package
    Example output:
    [INFO] Replacing main artifact with repackaged archive
    [INFO] BUILD SUCCESS
  3. Run the app in the background:
    java -jar target/spring-boot-docker-0.0.1-SNAPSHOT.jar &

    Example output:

      
      .   ____          _            __ _ _
     /\\ / ___'_ __ _ _(_)_ __  __ _ \ \ \ \
    ( ( )\___ | '_ | '_| | '_ \/ _` | \ \ \ \
      \/  ___)| |_)| | | | | || (_| |  ) ) ) )
      '  |____| .__|_| |_|_| |_\__, | / / / /
     =========|_|==============|___/=/_/_/_/
    :: Spring Boot ::                (vx.x.x)
    
    hello.Application: Started Application in x seconds (JVM running for x.x)
  4. Keep the code running and test the app in one of the following ways:
    • In Cloud Shell terminal, enter the following code:
      curl -X GET http://localhost:8080

      Output:

      <h1>Spring Boot Hello World!</h1>
  5. Stop the running application.
    • When you are done testing, get the process ID for your application and stop the process.
      ps -ef
    • Stop the process.
      kill <your-pid->
Build a Docker Image
A Docker image holds an application, its dependencies, and instructions to run the application.
  1. Change into the gs-spring-boot-docker/initial directory.
  2. Create a file named Dockerfile.
    FROM openjdk:8-jdk
    RUN addgroup --system spring && adduser --system spring -ingroup spring
    USER spring:spring
    ARG JAR_FILE=target/*.jar
    COPY ${JAR_FILE} app.jar
    ENTRYPOINT ["java","-jar","/app.jar"]

    If it works for you, remove the sudo in the following docker commands.

  3. Build the Docker image:
    docker build -t spring-boot-hello .

    Example output:

    Successfully built xxxxxxxxxxxx
    Successfully tagged spring-boot-hello:latest                    
  4. Run the Docker image:
    docker run -p 8080:8080 -t spring-boot-hello &

    You get the same result as running the local app.

  5. Stop the running application.
Congratulations! You have successfully created a Spring Boot Docker image.

Reference: Spring Boot Docker tutorial

4. Deploy Your Docker Image

Push your Spring Boot Docker image to OCI Container Registry. Then use the image to deploy your application.

Create a Docker Repository
  1. Open the navigation menu and click Developer Services. Under Containers & Artifacts, click Container Registry.
  2. In the left navigation, select <your-compartment-name>.
  3. Click Create Repository.
  4. Create a private repository with your choice of repo name:
    <repo-name> = <image-path-name>/<image-name>

    Example: spring-projects/spring-boot-hello-app

    You are now ready to push your local image to OCI registry.
    Note

    Before you push an image into a compartment, you must create a repository in that compartment.
    Note

    The slash in a repository name does not represent a hierarchical directory structure. The optional <image-path-name> helps to organize your repositories.
Push Your Local Image

With your local Docker image created, push the image to the Container Registry.

Follow these steps.

  1. Open a terminal window.
  2. Log in to OCI Container Registry:
    docker login <region-key>.ocir.io

    You are prompted for your login name and password.

    • Username: <tenancy-namespace>/<user-name>
    • Password: <auth-token>
  3. List your local Docker images:
    docker images

    The Docker images on your system are displayed. Identify the image you created in the last section: spring-boot-hello

  4. Tag your local image with the URL for the registry plus the repo name, so you can push it to that repo.
    docker tag <your-local-image> <repo-url>/<repo-name>
    • Replace <repo-url>/<repo-name> with:
      <region-key>.ocir.io/<tenancy-namespace>/<repo-name>
    • Replace <repo-name> with:

      <image-folder-name>/<image-name> from the Create a Docker Repository section.

    • Example:
      docker tag spring-boot-hello iad.ocir.io/my-namespace/spring-projects/spring-boot-hello-app

      In this example, the components are:

      • Repo URL: iad.ocir.io/my-namespace/
      • Repo name: spring-projects/spring-boot-hello-app
    Note

    OCI Container Registry now supports creating a registry repo in any compartment rather than only in the root compartment (tenancy). To push the image to the repo you created, combine the registry URL with the exact repo name. OCI Container Registry matches the unique repo name and pushes your image.
  5. Check your Docker images to see if the image is copied.
    docker images
    • The tagged or the copied image has the same image ID as your local image.
    • The copied image name is:
      <region-key>.ocir.io/<tenancy-namespace>/<image-folder-name>/<image-name>
  6. Push the image to Container Registry.
    docker push <copied-image-name>:latest
    Example:
    docker push iad.ocir.io/my-namespace/spring-projects/spring-boot-hello-app:latest
  7. Open the navigation menu and click Developer Services. Under Containers & Artifacts, click Container Registry.

Find your image in Container Registry after the push command is complete.

Deploy the Image
With your image in Container Registry, you can now deploy your image and app.
  1. Create a registry secret for your application. This secret authenticates your image when you deploy it to your cluster.

    To create your secret, fill in the information in this template .

    kubectl create secret docker-registry ocirsecret --docker-server=<region-key>.ocir.io  --docker-username='<tenancy-namespace>/<user-name>' --docker-password='<auth-token>'  --docker-email='<email-address>'

    After the command runs, you get a message similar to: secret/ocirsecret created.

  2. Verify that the secret is created. Issue the following command:
    kubectl get secret ocirsecret --output=yaml

    The output includes information about your secret in the yaml format.

  3. Determine the host URL to your registry image using the following template:
    <region-code>.ocir.io/<tenancy-namespace>/<repo-name>/<image-name>:<tag>
    Example:
    iad.ocir.io/my-namespace/spring-projects/spring-boot-hello-app:latest
  4. On your system, create a file called sb-app.yaml with the following text:
    Replace the following place holders:
    • <your-image-url>
    • <your-secret-name>
    apiVersion: apps/v1
    kind: Deployment
    metadata:
      name: sbapp
    spec:
      selector:
        matchLabels:
          app: sbapp
      replicas: 3
      template:
        metadata:
          labels:
            app: sbapp
        spec:
          containers:
          - name: sbapp
            image: <your-image-url>
            imagePullPolicy: Always
            ports:
            - name: sbapp
              containerPort: 8080
              protocol: TCP
          imagePullSecrets:
            - name: <your-secret-name>
    ---
    apiVersion: v1
    kind: Service
    metadata:
      name: sbapp-lb
      labels:
        app: sbapp
      annotations:
        service.beta.kubernetes.io/oci-load-balancer-shape: "flexible"
        service.beta.kubernetes.io/oci-load-balancer-shape-flex-min: "10"
        service.beta.kubernetes.io/oci-load-balancer-shape-flex-max: "100"
    spec:
      type: LoadBalancer
      ports:
      - port: 8080
      selector:
        app: sbapp
  5. Deploy your application with the following command.
    kubectl create -f sb-app.yaml
    Output:
    deployment.apps/sbapp created
    Note

    In the sb-app.yaml file, the code after the dashes adds a flexible load balancer.
Test Your App
After you deploy your app, it might take the load balancer a few seconds to load.
  1. Check if the load balancer is live:
    kubectl get service

    Repeat the command until load balancer is assigned an IP address.

    Note

    While waiting for the load balancer to deploy, you can check the status of your cluster with these commands:
    • Get each pods status: kubectl get pods
    • Get app status: kubectl get deployment
  2. Use the load balancer IP address to connect to your app in a browser:
    http://<load-balancer-IP-address>:8080

    The browser displays: Spring Boot Hello World!

  3. Undeploy your application from the cluster. (Optional) To remove your application run this command:
    kubectl delete -f sb-app.yaml
    Output:
    deployment.apps/sbapp deleted
    service "sbapp-lb" deleted

    Your application is now removed from your cluster.

What's Next

You have successfully created a Hello World application, deployed it to a Kubernetes cluster and made it accessible on the internet, using Spring Boot and OCI Cloud Shell.

To explore more information about development with Oracle products, check out these sites: