Test Suites and Test Cases
You can create a test case for different use cases. You create one of these test cases from JSON or by recording conversations in the Conversation Tester. These test cases are part of the skill's metadata so they persist across versions.
Because of this, you can run these test cases to ensure that any extensions made to the skill have not broken the basic functionality. Test cases are not limited to just preserving the core functions. You use them to test out new scenarios. As your skill evolves, you can retire the test cases that continually fail because of the changes that were introduced through extensions.
All test cases belong to a test suite, containers that enable you to
partition your testing. We provide a test suite called Default Test Suite, but you can
create your own as well. The Test Suites page lists all of the test suites and the test
cases that belong to them. The test suites listed on this page may be ones that you have
created, or they may have been inherited from a skill that you've extended or cloned.
You can use this page to create and manage test suites and test cases and compile test
cases into test runs.
Add Test Cases
Whether you're creating a skill from scratch, or extending a skill, you can create a test case for each use case. For example, you can create a test case for each payload type. You can build an entire suite of test cases for a skill by simply recording conversations or by creating JSON files that define message objects.
Create a Test Case from a Conversation
- Open the skill or digital assistant that you want to create the test for.
- In the toolbar at the top of the page, click
Preview.

- Click Bot Tester.
- Select the channel.
Note
Test cases are channel-specific: the test conversation, as it is handled by the selected channel, is what is recorded for a test case. For example, test cases recorded using one of the Skill Tester's text-based channels cannot be used to test the same convesation on the Oracle Web Channel. - Enter the utterances that are specific to the behavior or output that you want to test.
- Click Save As Test.

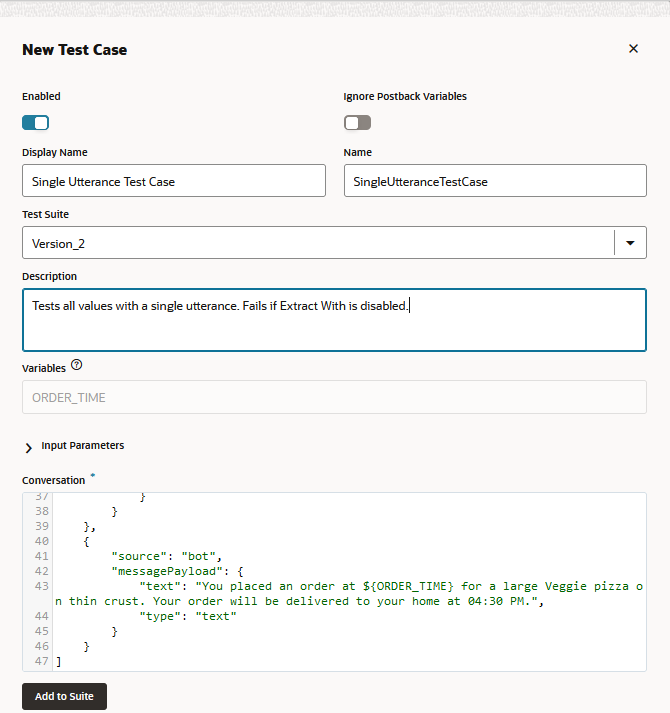
- Complete the Save Conversation as Test Case dialog:
- If needed, exlude the test case from test runs by switching off Enabled.
- If you're running a test case for conversations or messages that have postback actions, you can switch on Ignore Postback Variables to enable the test case to pass by ignoring the differences between the expected message and the actual message at the postback variable level.
- Enter a name and display name that describes the test.
- As an optional step, add details in the Description field that describe how the test case validates expected behavior for a scenario or use case.
- If needed, select a test suite other than Default Test Suite from the Test Suite list.
- To test for the different parameter values that users may
enter in their requests or responses, add arrays to the object in the Input Parameters
field for each input parameter and substitute corresponding placeholders
for the user input you're testing for in the Conversation text area. For
example, enter an array
{"AGE":["24","25","26"]}in the Input Parameters field and${"AGE"}(the placeholder) in the Conversation text area. - If the skill or digital assistant responses include dynamic
information like timestamps that will cause test cases to continually
fail, replace the variable definition that populates these values with a
placeholder that's formatted as
${MY_VARIBALE_NAME}.
- Click Add to Suite.
Add Input Parameters for User Messages
While you add variable placeholders to ensure that test cases pass when
skill messages have constantly changing values, you add input parameters to test for a
variety of values in user messages. Input parameters simplify testing because they
enable you to run multiple variations of a single test case. Without them, you'd need to
create duplicate test cases for each parameter value. Because of the flexibility
afforded by input parameters, however, you can generate multiple test results by just
adding an array for the input parameter values in your test case definition. When you
run the test case, separate test results are generated for each of element in your input
parameter array definition. An array of three input parameter key-value pairs results in
a test run with three test outcomes, for example. The numbering of these results is
based on the index of the corresponding array element.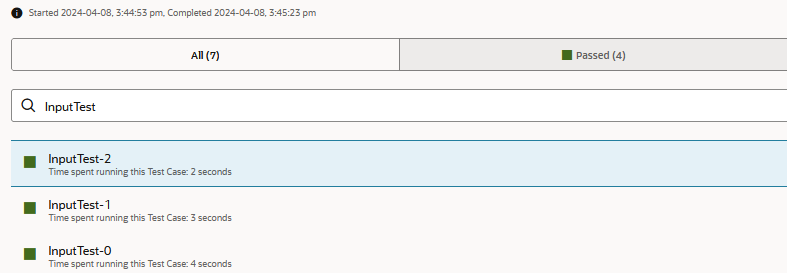
text value in the message payload of the user message with a
placeholder and define a corresponding array of parameter values:
- In the Bot Tester view, click Save as Test.
- In the Conversation text area, replace the
textfield value in a user message ({"source": "user", ...}) with an Apache FreeMarker expression that names the input parameter. For example,"${AGE}"in the following snippet:{ "source": "user", "messagePayload": { "type": "text", "text": "${AGE}", "channelExtensions": { "test": { "timezoneOffset": 25200000 } } } }, - Click
 to expand the Input Parameters field.
- In the Input Parameters field object (
{}), add key value pairs for each parameter. The values must be arrays of string values. For example:{"AGE":["24","25","26"], "CRUST": ["Thick","Thin"]}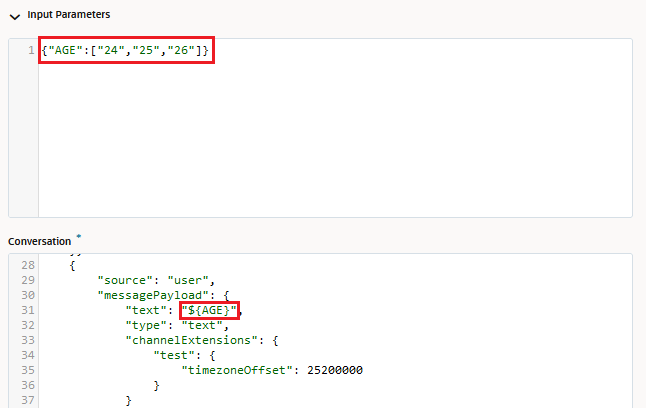
Here are some things to note when defining input parameters:- Use arrays only – Input parameters must be set as arrays,
not strings.
{"NAME": "Mark"}results in a failed test outcome, for example. - Use string values in your array – All the array elements
must be strings. If you enter an element as an integer value instead
(
{"AGE": ["25", 26]}, for example), it will be converted to a string. No test results are generated for null values.{ "AGE": [ "24", "25", null ] }results in two test results, not three. - Use consistent casing – The casing for the key and the
placeholder in the FreeMarker expression must match. Mismatched casing
(
AgeandAGE, for example), will cause the test case to fail.
- Use arrays only – Input parameters must be set as arrays,
not strings.
- Click Add to Suite.
Add Variable Placeholders
Variables with ever-changing values in skill or digital assistant responses
will cause test cases to fail when the test run compares the actual value to the
expected value. You can exclude dynamic information from the comparison by substituting
a placeholder that's formatted as ${MY_VARIBALE_NAME} in the skill
response. For example, a temporal value, such as the one returned by the
${.now?string.full} Apache FreeMarker date operation, will cause
test cases to continually fail because of the mismatch of the time when the test case
was recorded and the time when the test case was run. 
messagePayload object in the Conversation text area with a
placeholder. For example, ${ORDER_TIME} replaces a date string like
Monday, April 8, 2024 7:42:46 PM UTC in the
following:{
"source": "bot",
"messagePayload": {
"type": "text",
"text": "You placed an order at ${ORDER_TIME} for a large Veggie pizza on thin crust. Your order will be delivered to your home at 04:30 PM."
}
}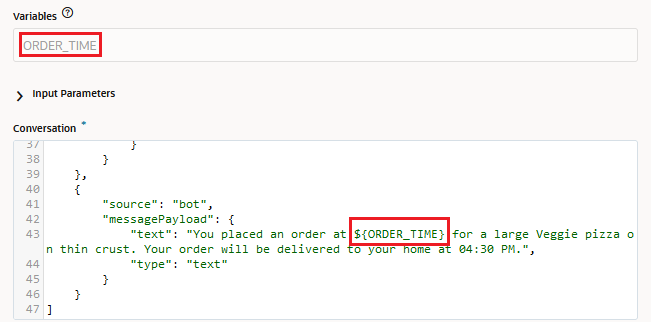
For newly created test cases, the Variable field notes the SYSTEM_BOT_ID placeholder that's automatically substituted for the
system.botId values that change when the skill
has been imported from another instance or cloned.
Create a Test Case from a JSON Object
[]) Conversations window with
the message objects. Here is template for the different payload
types: {
source: "user", //text only message format is kept simple yet extensible.
type: "text"
payload: {
message: "order pizza"
}
},{
source: "bot",
type: "text",
payload: {
message: "how old are you?"
actions: [action types --- postback, url, call, share], //bot messages can have actions and globalActions which when clicked by the user to send specific JSON back to the bot.
globalActions: [...]
}
},
{
source: "user",
type: "postback"
payload: { //payload object represents the post back JSON sent back from the user to the bot when the button is clicked
variables: {
accountType: "credit card"
},
action: "credit card",
state: "askBalancesAccountType"
}
},
{
source: "bot",
type: "cards"
payload: {
message: "label"
layout: "horizontal|vertical"
cards: ["Thick","Thin","Stuffed","Pan"], // In test files cards can be strings which are matched with button labels or be JSON matched
cards: [{
title: "...",
description: "..."
imageUrl: "...",
url: "...",
actions: [...] //actions can be specific to a card or global
}],
actions: [...],
globalActions: [...]
}
},
{
source: "bot|user",
type: "attachment" //attachment message could be either a bot message or a user message
payload: {
attachmentType: "image|video|audio|file"
url: "https://images.app.goo.gl/FADBknkmvsmfVzax9"
title: "Title for Attachment"
}
},
{
source: "bot",
type: "location"
payload: {
message: "optional label here"
latitude: 52.2968189
longitude: 4.8638949
}
},
{
source: "user",
type: "raw"
payload: {
... //free form application specific JSON for custom use cases. Exact JSON matching
}
}
...
//multiple bot messages per user message possible.]
}
Run Test Cases
You can't delete an inherited test case, you can only disable it.
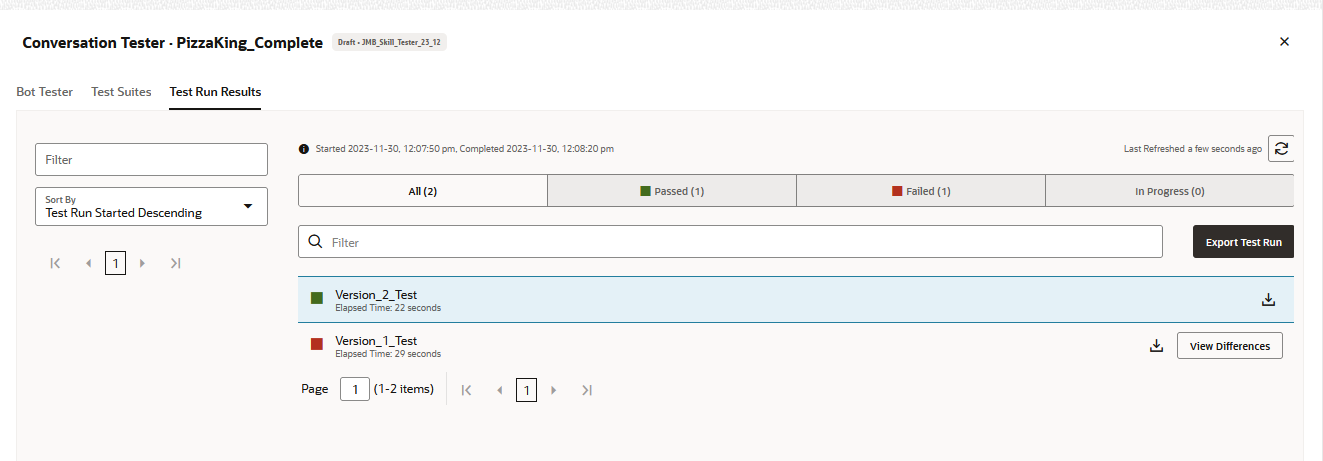
View Test Run Results
The test run results for each skill are stored for a period of 14 days, after which they are removed from the system.
Review Failed Test Cases
The report lists the points of failure at the message level, with the
Message Element column noting the position of the skill message within the test case
conversation. For each message, the report provides a high-level comparison of the
expected and actual payloads. To drill down to see this comparison in detail – and to
reconcile the differences to allow this test case to pass in future test runs – click
the Actions menu.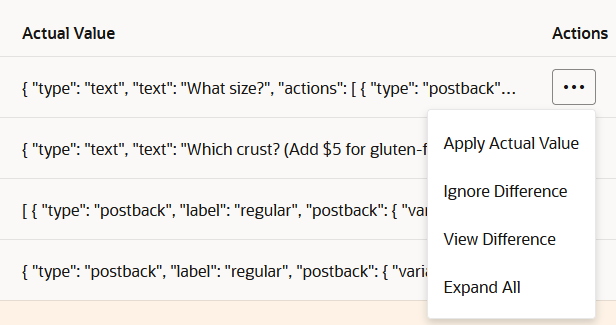
Fix Failed Test Cases
- Expand All – Expands the message object nodes.
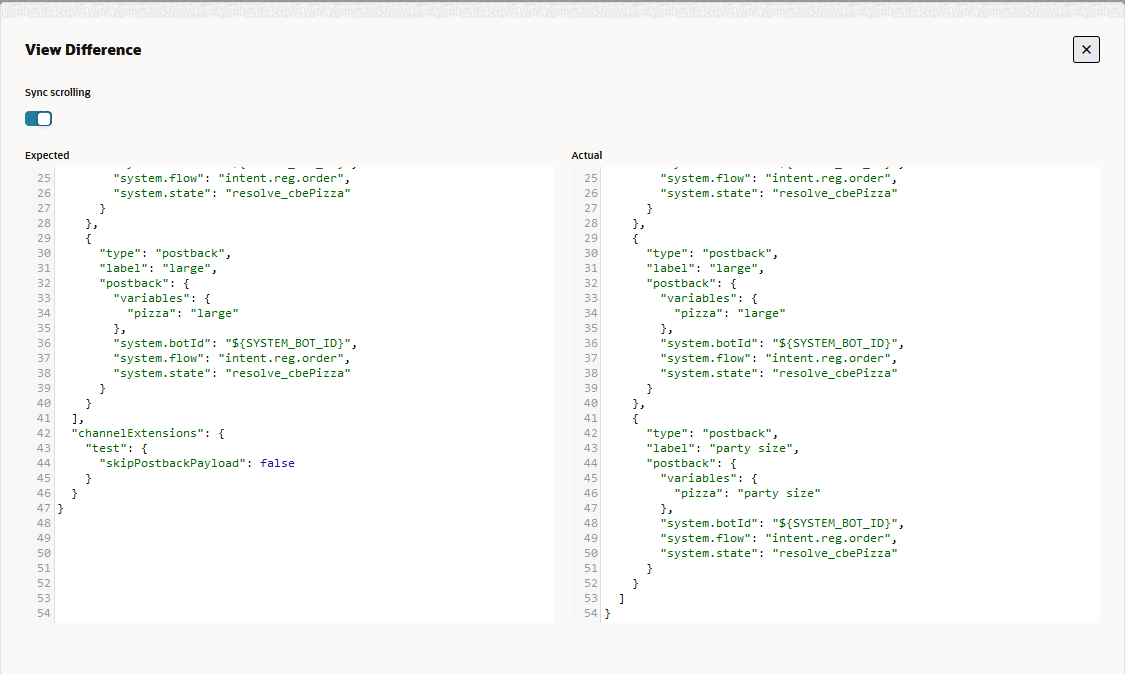
- View Difference – Provides a side-by-side
comparison of the actual and expected output. The view varies depending on the
node. For example, you can view a single action, or the entire actions array.
You can use this action before you reconcile the actual and expected output.
- Ignore Difference – Choose this action when clashing values don’t affect the functionality. If you have multiple differences and you don't want to go through them one-by-one, you can choose this option. At the postback level, for example, you can apply actual values individually, or you can ignore differences for the whole postback object.
- Apply Actual Value – Some changes, however
small, can cause many of the test cases to fail within the same run. This is
often the case with changes to text strings such as prompts or labels. For
example, changing a text prompt from "How big of a pizza do you want?" to "What
pizza size?" will cause any test case that includes this prompt to fail, even
though the skill's functionality remains unaffected. While you can accommodate
this change by either re-recording the test case entirely, you can instead
quickly update the test case definition with the revised prompt by clicking
Apply Actual Value. Because the test case is now in
step with the new skill definition, the test case will pass (or at least not
fail because of the changed wording) in future test runs.
Note
While you can apply string values, such as prompts and URLs, you can't use the Apply Actual Value to fix a test case when a change to an entity's values or its behavior (disabling the Out of Order Extraction function, for example) causes the values provided by the test case to become invalid. Updating an entity will cause the case will fail because the skill will continually prompt for a value that it will never receive and its responses will be out of step with the sequence defined by the test case. - Add Regular Expression – You can substitute
a Regex expression to resolve clashing text values. For example, you add
user*to resolve conflictinguseranduser1strings. - Add – At the postback level of the traversal, Add actions appear when a revised skill includes postback actions that were not present in the test case. To prevent the test case from failing because of the new postback action, you can click Add to include it in the test case. (Add is similar to Apply Actual Value, but at the postback level.)
The set of test results generated for input parameters all refer to the same original test case, so reconciling an input parameter value in one test result simultaneously reconciles the values for that input parameter in the rest of the test results.
Import and Export Test Cases
- To export a test suite, first select the test suite (or test suites). Then
click More > Export Selected Suite, or
Export All. (You can also export all test suites by selecting
Export Tests from the kebab menu

in the skill tile.) The exported ZIP file contains a folder calledtestSuitesthat has a JSON file describing the exported test suite. Here's an example of the JSON format:{ "displayName" : "TestSuite0001", "name" : "TestSuite0001", "testCases" : [ { "channelType" : "websdk", "conversation" : [ { "messagePayload" : { "type" : "text", "text" : "I would like a large veggie pizza on thin crust delivered at 4:30 pm", "channelExtensions" : { "test" : { "timezoneOffset" : 25200000 } } }, "source" : "user" }, { "messagePayload" : { "type" : "text", "text" : "Let's get started with that order" }, "source" : "bot" }, { "messagePayload" : { "type" : "text", "text" : "How old are you?" }, "source" : "bot" }, { "messagePayload" : { "type" : "text", "text" : "${AGE}", "channelExtensions" : { "test" : { "timezoneOffset" : 25200000 } } }, "source" : "user" }, { "messagePayload" : { "type" : "text", "text" : "You placed an order at ${ORDER_TIME} for a large Veggie pizza on thin crust. Your order will be delivered to your home at 04:30 PM." }, "source" : "bot" } ], "description" : "Tests all values with a single utterance. Uses input parameters and variable values", "displayName" : "Full Utterance Test", "enabled" : true, "inputParameters" : { "AGE" : [ "24", "25", "26" ] }, "name" : "FullUtteranceTest", "platformVersion" : "1.0", "trackingId" : "A0AAA5E2-5AAD-4002-BEE0-F5D310D666FD" } ], "trackingId" : "4B6AABC7-3A65-4E27-8D90-71E7B3C5264B" } - Open the Test Suites page of the target skill, then click More > Import.
- Browse to, then select, the ZIP file containing the JSON definition of the test suites. Then click Upload.
- After the import has completed, click Download
Report in the Confirmation notification to find out more details about the
import in the JSON file that's included in the downloaded ZIP file.

For example:{ "status" : "SUCCESS", "statusMessage" : "Successfully imported test cases and test suites. Duplicate and invalid test cases/test suites ignored.", "truncatedDescription" : false, "validTestSuites" : 2, "duplicateTestSuites" : 0, "invalidTestSuites" : 0, "validTestCases" : 2, "duplicateTestCases" : 0, "invalidTestCases" : 0, "validationDetails" : [ { "name" : "DefaultTestSuite", "validTestCases" : 1, "duplicateTestCases" : 0, "invalidTestCases" : 0, "invalidReasons" : [ ], "warningReasons" : [ ], "testCasesValidationDetails" : [ { "name" : "Test1", "invalidReasons" : [ ], "warningReasons" : [ ] } ] }, { "name" : "TestSuite0001", "validTestCases" : 1, "duplicateTestCases" : 0, "invalidTestCases" : 0, "invalidReasons" : [ ], "warningReasons" : [ ], "testCasesValidationDetails" : [ { "name" : "Test2", "invalidReasons" : [ ], "warningReasons" : [ ] } ] } ] }

To find the cause of the failed outcome, review the
invalidReasons
array in the downloaded importJSON
file. "testCasesValidationDetails" : [ {
"name" : "Test",
"invalidReasons" : [ "INVALID_INPUT_PARAMETERS" ],
...