Functions: Get Started using Cloud Shell

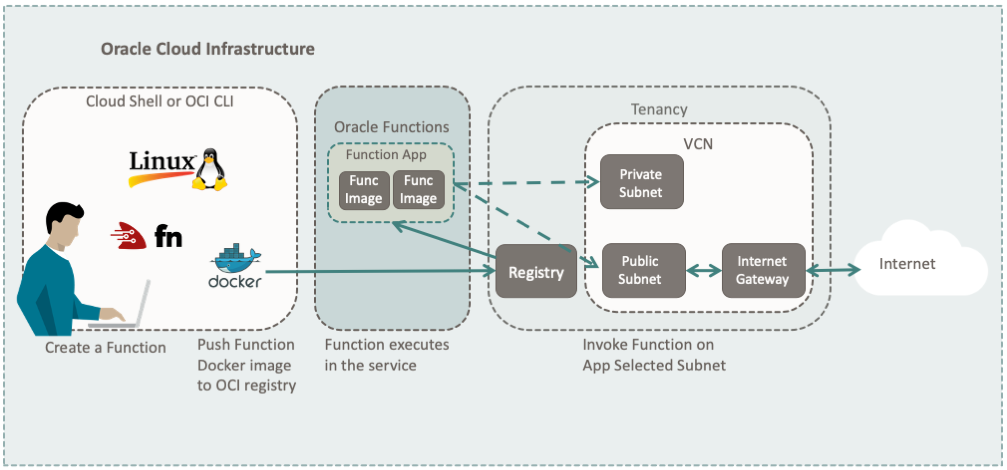
In this tutorial, you use an Oracle Cloud Infrastructure account to set up Oracle Functions development using Cloud Shell. Then, you create a function application and a function.

Key tasks include how to:

  • Set up an authentication token.
  • Gather required information.
  • Set up a VCN.
  • Log in to OCI Registry (OCIR).
  • Configure Cloud Shell to deploy functions.
  • Configure your Fn context.
  • Create an app for your Oracle function.
  • Create a function.
  • Deploy your function.
  • Test your function.
The images shows OCI components used to run Oracle functions.

For additional information, see:

1. Gather Required Information

Collect all the information needed to complete the tutorial.

Gather Region and Registry Information

Prepare the information you need from the OCI Console.

  1. Find your region identifier and region key from Regions and Availability Domains.

    Example: us-ashburn-1 and iad for Ashburn.

  2. Create a registry project name to store your function images in OCI Registry (OCIR).

    When you publish a function, a Docker image is created in OCIR. Your OCIR project name is prepended to your function images to make them easy to find. For example, given:

    • Registry project name: my-func-prj
    • Function name: node-func

    Your function image would be stored on OCIR under: my-func-prj/node-func

Create or Select a Compartment

To create a compartment see Create a compartment. After your compartment is created, save the compartment OCID.

To get the compartment OCID from an existing compartment:

  1. Open the navigation menu and click Identity & Security. Under Identity, click Compartments.
  2. Select your compartment.
  3. Click the Copy link for the OCID field.
Create an Authorization Token

You create an authorization token to log in to the OCI Registry. To create an authorization token:

  1. In the top navigation bar, open the Profile menu.
  2. Select your username.
  3. Click Auth Tokens.
  4. Click Generate Token.
  5. Give it a description.
  6. Click Generate Token.
  7. Copy the token and save it.
    Note

    Ensure that you save your token right after you create it. You do not have access to it later.
Collect your Information

Collect all the information needed to complete the tutorial. Copy the following information into your notepad.

  1. Region: <region-identifier>

    Example: us-ashburn-1.

  2. Region Key: <region-key>

    Example: iad.

  3. Registry Project Name: <your-project-name>

    Example: my-func-prj.

  4. Compartment ID: <compartment-id>

    Example: ocid1.compartment.oc1.aaaaaaa...

  5. Auth Token: <auth-token>

    Example: ABC.1aBC...

  6. Tenancy name: <tenancy-name>

    From your user avatar, example: mytenancyname

  7. Tenancy OCID: <tenancy-ocid>

    From your user avatar, go to Tenancy: <your-tenancy> and copy OCID, example: ocid1.tenancy.oc1.aaaaaaa...

  8. Username: <user-name>

    From your user avatar.

2. Create your Virtual Cloud Network (VCN)

Set up a VCN to connect your Linux instance to the internet.

Configure your VCN

To configure virtual cloud network, perform the following steps.

  1. Click the Oracle Cloud icon to go to the main landing page.
    • Scroll down to Launch Resources.
    • Select Set up a network with a wizard.
  2. In the Start VCN Wizard workflow, select Create VCN with Internet Connectivity and then click Start VCN Wizard .
  3. In the configuration dialog, fill in the VCN Name for your VCN. Your Compartment is already set to the last compartment you were working in, or if it's your first time, to its default value of <your-tenancy> (root).
  4. In the Configure VCN and Subnets section, keep the default values for the CIDR blocks:
    • VCN CIDR BLOCK: 10.0.0.0/16
    • PUBLIC SUBNET CIDR BLOCK: 10.0.0.0/24
    • PRIVATE SUBNET CIDR BLOCK: 10.0.1.0/24
    Note

    Notice the public and private subnets have different network addresses.
  5. For DNS Resolution, uncheck Use DNS hostnames in this VCN.
  6. Click Next.

    The Create a VCN with Internet Connectivity configuration dialog is displayed (not shown here) confirming all the values you just entered.

  7. Click Create to create your VCN.

    The Creating Resources dialog is displayed (not shown here) showing all VCN components being created.

  8. Click View Virtual Cloud Network to view your new VCN.

    Your new VCN is displayed. Now you need to add a security rule to allow HTTP connections on port 80, the default port for your applications.

  9. With your new VCN displayed, click your Public subnet link.

    The public subnet information is displayed with the Security Lists at the bottom of the page. There should be a link to the Default Security List for your VCN.

  10. Click the Default Security List link.

    The default Ingress Rules for your VCN are displayed.

  11. Click Add Ingress Rules.

    An Add Ingress Rules dialog is displayed.

  12. Fill in the ingress rule with the following information. Once all the data is entered, click Add Ingress Rules.

    Fill in the ingress rule as follows:

    • Stateless: Checked
    • Source Type: CIDR
    • Source CIDR: 0.0.0.0/0
    • IP Protocol: TCP
    • Source Port Range: (leave-blank)
    • Destination Port Range: 80
    • Description: VCN for applications

    Once you click Add Ingress Rules, HTTP connections are allowed to your public subnet.

Note

To open a different port, replace 80 in the last step with the port number.
You have successfully created a VCN that makes your applications available from the internet.

3. Log into the OCI Registry

Next, you log Docker into the OCI Registry (OCIR).

Log Docker into OCIR
  1. Get the information you gathered earlier.
  2. Open a terminal window.
  3. Log in to OCIR:
    docker login <region-key>.ocir.io

    You are prompted for your login name and password.

    • Username: <tenancy-name>/<user-name>
    • Password: <auth-token>

You have logged your instance into OCIR.

4. Configure Functions

To use Oracle Functions, you must configure the Fn application context. The context stores the values needed to connect to the Oracle Functions service. Fn client commands are used to add the required configuration data.

Configure the Fn Context for the Cloud Shell

You need the information you gathered from earlier on. Use Fn client commands to configure Fn.

  1. Open your Cloud Shell instance.
  2. Get a list of Fn contexts.

    fn list context

    You see contexts for default and <your-region-identifier>.

  3. Select the context named with <your-region-identifier>.

    For example: fn use context us-phoenix-1

  4. List the Fn contexts to ensure <your-region-identifier> is selected. (Has a star next to it.)
  5. Set the compartment for Oracle Functions.

    Example: fn update context oracle.compartment-id ocid1.compartment.oc1..aaaaaaaarvdfa72n...

  6. Set the URL for your Registry repository.

    Sample command: fn update context registry <region-key>.ocir.io/<tenancy-namespace>/<registry-project-name>

    Example: fn update context registry phx.ocir.io/my-tenancy/my-func-prj

Note

View/Edit your Context

Your Fn context files are in the ~/.fn/contexts directory. Each context is stored in a .yaml file. For example, your us-phoenix-1.yaml file might look similar to:

api-url: https://functions.us-phoenix-1.oci.oraclecloud.com
oracle.compartment-id: ocid1.compartment.oc1..aaaaaaaarvdfa72n...
provider: oraclecs
registry: phx.ocir.io/my-tenancy/my-func-prj
                

You can edit the file directly with an editor if necessary.

For a detailed explanation of each step, see: Oracle Functions on Cloud Shell Quickstart

You have now setup the Fn context for your instance.

5. Create and Deploy a Function

With your configuration complete, create and deploy a function.

Create an Application

An Application is the main storage container for functions. Each function must have an application for deployment. To create application, follow these steps.

  1. Open the navigation menu and click Developer Services. Under Functions, click Applications.
  2. Click Create Application.

    Fill in the form data.

    • Name: <your-app-name>
    • VCN: <your-VCN>
    • Subnets: <your-public-subnet> or <your-private-subnet>
    Note

    A public or private subnet can be used, select one.
  3. Click Create.

Your app is created.

Choose a Language

Select one of the following languages to create and deploy a function. If you want, you can do all three.

Create and Deploy a Java Function

With your application created, deploy a Java function. Follow these steps to create a Java "Hello World" function.

Note

Ensure Java 8+ is installed to perform these steps.
  1. Open Cloud Shell.
  2. Create a directory to store your functions and change into that directory.
    mkdir my-dir-name
    cd my-dir-name                        
                        
  3. Create a Java "Hello World" function with Fn.
    fn init --runtime java my-func-name

    This command creates a directory named my-func-name with several files in it.

    • func.yaml - Function configuration file.
    • pom.xml - Maven build file.
    • src/main/java/com/example/fn/HelloFunction.java - The actual function file.
  4. Change into the directory.
  5. Deploy the function.
    fn -v deploy --app your-app-name

    Various messages are displayed as the docker images are built, pushed to OCIR, and eventually deployed to Oracle Functions.

  6. Invoke the function.
    fn invoke your-app-name my-func-name

    Returns: Hello, world!

  7. Invoke the function with a parameter.
    echo -n "Bob" | fn invoke your-app-name my-func-name

    Returns: Hello, Bob!

  8. If you want to connect to your function from the net, you need to get the function's invoke endpoint. To find your invoke endpoint use the inspect command.
    fn inspect function your-app-name my-func-name
  9. Examine the results of the inspect command. Notice the invoke endpoint URL is included in the annotatins section of the returned JSON data.
    {
        "annotations": {
            "fnproject.io/fn/invokeEndpoint": "https://aaaaaaaaa.us-ashburn-1.functions.oci.oraclecloud.com/1111111/functions/ocid1.fnfunc.oc1.iad.aaaaaaaaa.../actions/invoke",
            "oracle.com/oci/compartmentId": "ocid1.compartment.oc1..aaaaaaaa...",
            "__comment":"Remaining output left out for brevity",
    
  10. Use the URL returned from inspect to invoke the function. Because functions require requests to be digitally signed, the oci raw-request command is used for this example.
    oci raw-request --http-method POST --request-body "" --target-uri https://https://aaaaaaaaa.us-ashburn-1.functions.oci.oraclecloud.com/1111111/functions/ocid1.fnfunc.oc1.iad.aaaaaaaaa.../actions/invoke

    The command returns:

    {
        "data": "Hello, world!",
        "headers": {
            "Content-Length": "13",
            "Content-Type": "text/plain",
            "Date": "Tue, 20 Oct 2020 00:53:08 GMT",
            "Fn-Call-Id": "11111111111",
            "Fn-Fdk-Version": "fdk-java/1.0.111 (jvm=OpenJDK 64-Bit Server VM, jvmv=11.0.8)",
            "Opc-Request-Id": "1111111/11111"
        },
        "status": "200 OK"
    }
    Note

    You can connect to a Functions endpoint using tools like curl. However, because of security considerations, the script is complex. As an alternative, use the OCI CLI raw-request command. See Invoking Functions: Sending a Signed Request to a Function with raw-request.

You have successfully deployed and tested a Java function.

Create and Deploy a Python Function

With your application created, deploy a Python function. Follow these steps to create a Python "Hello World" function.

  1. Open Cloud Shell.
  2. Create a directory to store your functions and change into that directory.
    mkdir my-dir-name
    cd my-dir-name                        
                        
  3. Create a Python "Hello World" function with Fn.
    fn init --runtime python my-func-name

    This command creates a directory named my-func-name with several files in it.

    • func.yaml - Function configuration file.
    • requirements.txt - List of required Python libraries.
    • func.py - The actual function file.
  4. Change into the directory.
  5. Deploy the function.
    fn -v deploy --app your-app-name

    Various messages are displayed as the docker images are built, pushed to OCIR, and eventually deployed to Oracle Functions.

  6. Invoke the function.
    fn invoke your-app-name my-func-name

    Returns: {"message": "Hello World"}

  7. Invoke the function with a parameter.
    echo -n '{"name":"Bob"}' | fn invoke your-app-name my-func-name

    Returns: {"message": "Hello Bob"}

  8. If you want to connect to your function from the net, you need to get the function's invoke endpoint. To find your invoke endpoint use the inspect command.
    fn inspect function your-app-name my-func-name
  9. Examine the results of the inspect command. Notice the invoke endpoint URL is included in the annotatins section of the returned JSON data.
    {
        "annotations": {
            "fnproject.io/fn/invokeEndpoint": "https://aaaaaaaaa.us-ashburn-1.functions.oci.oraclecloud.com/1111111/functions/ocid1.fnfunc.oc1.iad.aaaaaaaaa.../actions/invoke",
            "oracle.com/oci/compartmentId": "ocid1.compartment.oc1..aaaaaaaa...",
            "__comment":"Remaining output left out for brevity",
    
  10. Use the URL returned from inspect to invoke the function. Because functions require requests to be digitally signed, the oci raw-request command is used for this example.
    oci raw-request --http-method POST --request-body "" --target-uri https://https://aaaaaaaaa.us-ashburn-1.functions.oci.oraclecloud.com/1111111/functions/ocid1.fnfunc.oc1.iad.aaaaaaaaa.../actions/invoke

    The command returns:

    {
        "data": "Hello World",
        "headers": {
            "Content-Length": "24",
            "Content-Type": "application/json",
            "Date": "Tue, 20 Oct 2020 00:53:08 GMT",
            "Fn-Call-Id": "11111111111",
            "Fn-Fdk-Version": "fdk-python/0.1.18",
            "Opc-Request-Id": "1111111/11111"
        },
        "status": "200 OK"
    }
    Note

    You can connect to a Functions endpoint using tools like curl. However, because of security considerations, the script is complex. As an alternative, use the OCI CLI raw-request command. See Invoking Functions: Sending a Signed Request to a Function with raw-request.

You have successfully deployed and tested a Python function.

Create and Deploy a Node Function

With your application created, deploy a Node function. Follow these steps to create a Node "Hello World" function.

Note

Ensure Node.js 10+ is installed to perform these steps.
  1. Open Cloud Shell.
  2. Create a directory to store your functions and change into that directory.
    mkdir my-dir-name
    cd my-dir-name                        
                        
  3. Create a Node "Hello World" function with Fn.
    fn init --runtime node my-func-name

    This command creates a directory named my-func-name with several files in it.

    • func.yaml - Function configuration file.
    • package.json - NPM build file.
    • func.js - The actual function file.
  4. Change into the directory.
  5. Deploy the function.
    fn -v deploy --app your-app-name

    Various messages are displayed as the docker images are built, pushed to OCIR, and eventually deployed to Oracle Functions.

  6. Invoke the function.
    fn invoke your-app-name my-func-name

    Returns: {"message":"Hello World"}

  7. Invoke the function with a parameter.
    echo -n '{"name":"Bob"}' | fn invoke your-app-name my-func-name

    Returns: {"message":"Hello Bob"}

  8. If you want to connect to your function from the net, you need to get the function's invoke endpoint. To find your invoke endpoint use the inspect command.
    fn inspect function your-app-name my-func-name
  9. Examine the results of the inspect command. Notice the invoke endpoint URL is included in the annotatins section of the returned JSON data.
    {
        "annotations": {
            "fnproject.io/fn/invokeEndpoint": "https://aaaaaaaaa.us-ashburn-1.functions.oci.oraclecloud.com/1111111/functions/ocid1.fnfunc.oc1.iad.aaaaaaaaa.../actions/invoke",
            "oracle.com/oci/compartmentId": "ocid1.compartment.oc1..aaaaaaaa...",
            "__comment":"Remaining output left out for brevity",
    
  10. Use the URL returned from inspect to invoke the function. Because functions require requests to be digitally signed, the oci raw-request command is used for this example.
    oci raw-request --http-method POST --request-body "" --target-uri https://https://aaaaaaaaa.us-ashburn-1.functions.oci.oraclecloud.com/1111111/functions/ocid1.fnfunc.oc1.iad.aaaaaaaaa.../actions/invoke

    The command returns:

    {
        "data": "Hello World",
        "headers": {
            "Content-Length": "23",
            "Content-Type": "application/json",
            "Date": "Tue, 22 Oct 2020 00:53:08 GMT",
            "Fn-Call-Id": "11111111111",
            "Fn-Fdk-Version": "fdk-node/0.1.18 (njsv=v11.15.0)",
            "Opc-Request-Id": "1111111/11111"
        },
        "status": "200 OK"
    }
    Note

    You can connect to a Functions endpoint using tools like curl. However, because of security considerations, the script is complex. As an alternative, use the OCI CLI raw-request command. See Invoking Functions: Sending a Signed Request to a Function with raw-request.

You have successfully deployed and tested a Node function.

6. Review Function Information

After your functions run, information about your functions is available in the OCI Console.

View Function Images in OCIR

When you deploy, the function is uploaded and stored in OCIR. You can navigate to OCIR and examine the function images.

  1. Open the navigation menu and click Developer Services. Under Containers & Artifacts, click Container Registry.
  2. Search for the <your-repository-project-name>.
  3. Under your project name, you see an entry for each function you deployed.
  4. Click the link of each image you want to see information about.
View Function Execution Information

After you run a function, you can display metrics for that function.

  1. Open the navigation menu and click Developer Services. Under Functions, click Applications. Your applications are listed on the page.
  2. Click the link to the application you created.
  3. Click the link to the function you want to examine.

    Metric information about your function is displayed.

Enable and View Logging Information

To enable logging for an application, follow these steps.

  1. Open the navigation menu and click Developer Services. Under Functions, click Applications. Your applications are listed on the page.
  2. Click the link to the application you created.
  3. On the left side of the application page, click the Logs link.
  4. Click Disabled to enable logging for your application.
  5. The Enable Log dialog is displayed. Fill in the following information:
    • Compartment: <your-compartment-name>
    • Log Group: Take the default value Auto-Create a Default Log Group
    • Log name: <take-default>
    • Log Retention: <take-default>
    • Click Enable Log

      Wait a moment for your log to be created.

To view your log, click the log name link created by the preceding steps.