Webviews
Your skill can allow its customers to enter structured data using a Webview app.
Natural language conversations are, by their very nature, free-flowing. But they may not always be the best way for your skill to collect information from its users. For example, when entering credit card or passport details, users need to enter specific information (and enter it precisely). To help with these kinds of tasks, your skill can call a webview app.
These apps not only enable structured data entry through UI elements like
forms, date pickers, fields, and LOVs, but they can also validate the user input and
collect information in various ways, like uploading images, capturing user signatures,
or scanning barcodes. Webview apps also protect sensitive user data like credit card
numbers because this data doesn’t appear the chat history when it’s entered into the
app.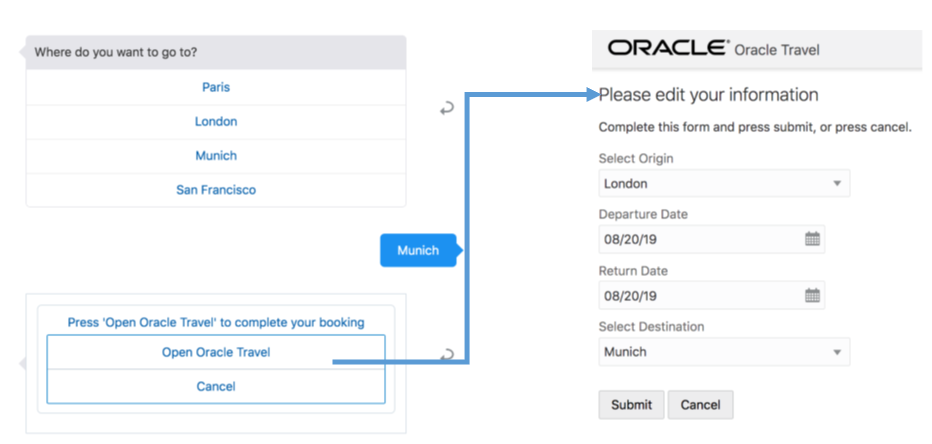
How Do I Integrate a Webview into a Skill?
- A Webview Service that connects the skill to the web app, which can be hosted on an external web server, or within Digital Assistant.
- A System.Webview component definition in the dialog flow. This component acts a gateway to
the web app by naming the Webview Service, (
service:"oracletravelweb"in the following snippet), listing the dialog flow variables that get based to the web app in itssourceVariableListproperty, and if the web app returns any values, theSystem.Webviewstores them in itsvariableproperty (webviewresponsein the following snippet).callWebview: component: "System.Webview" properties: sourceVariableList: "origin,destination" variable: "webviewresponse" prompt: "Press 'Open Oracle Travel'..." service: "oracletravelweb" linkLabel: "Open Oracle Travel" cancelLabel: "Cancel" transitions: next: "handleResponse" actions: textReceived: "onCancel" cancel: "onCancel"At runtime, the component renders a button that launches the web app. The
System.Webviewcomponent launches the app as a webview within the skill, or in a separate browser tab when the skill runs on a web channel. - The web app itself, which is hosted within Digital Assistant, or on a remote web server.
Tip:
Refer to the webhook starter sample that's described in the SDK documentation athttps://oracle.github.io/bots-node-sdk/.
Digital Assistant-Hosted Webviews
index.html) that launches the web app and gets updated in response
to the skill user's input. When the System.Webview component calls the
SPA:
- The
index.htmlis loaded and launches the web app as a webview or in a separate browser tab. - The
System.Webviewcomponent then passes the parameter values collected in the dialog flow along with the callback URL. Enable the SPA to Access the Input Parameters and Callback URL describes different approaches to passing these values. - The web app makes a POST request to the callback URL that was
generated by the
System.Webviewcomponent. This request signals that the app has completed its processing. If the app returns data, it's included in this request as a JSON object that gets stored in thevariableproperty. You can reference this data in your dialog flow using${variable_property_name.value.Param}.
You can write the SPA using different frameworks, such as Oracle Visual Builder, Angular, Oracle JavaScript Extension Toolkit (JET), or React.js.
The backend for Oracle Visual Builder manages REST connections, users (through Oracle Identity Cloud Service), and runs business objects, so any Oracle Visual Builder app hosted within Digital Assistant will have the following limitations:
- It can't use business objects.
- It can't integrate with Oracle Identity Cloud Service.
- It can't access a REST service using the Oracle Visual Builder authentication proxy.
To host the app within Digital Assistant you must bundle it into a TAR archive (a TGZ file). Because this is a SPA, the
index.html file must be at the root of this package.
Enable the SPA to Access the Input Parameters and Callback URL
System.Webview component injects the
window.webViewParameters variable (shown in the following snippet)
into the <head> element of the index.html file
at runtime. The key-values pairs in the payload inform the SPA of the input values
passed from the
skill.window.webviewParameters = {
parameters: [
{"key": "variableA", "value": "jsonObjA"},
{"key": "variableB", "value": "jsonObjB"},
...
{"key": "webview.onDone",
"value": "https://host:port/patch"},
]
};
window.webviewParameters['parameters']
variable:let webviewParameters = window.webviewParameters !=null?window.webviewParameters['parameters']:null;
System.Webview's
variable property because of the callback.
app.js file, the
function returns the value for a named key. If it cannot be found, it sets a default
value.
Tip:
You can use this snippet in your own code. You can usevar getParam instead of
this.getParam.
class App extends Component {
    constructor(props) {
        super(props);

        let wvParams = window.webviewParameters['parameters'];

        this.getParam = (arrParams, key, defaultValue) => {
            if (arrParams) {
                let param = arrParams.find(e => {
                    return e.key === key;
                });
                return param ? param.value : defaultValue;
            }
            return defaultValue;
        };
Defining Placeholders in the index.html File
When you host the SPA within Digital Assistant, you don't need to define any placeholders for the variable values in the
index.html file. As long as the index.html file
has a <head> element, your web app will know what values to
expect, and the callback.
Add a Single Placeholder in the <head> Element
Within the <head> element, insert a
<script> block with the
webview.sourceVariableList placeholder. The web app replaces this
with a JSON-encoded string that has the input parameter data and the callback URL.
In the following example, the key is window.wvParams. You
can use any name for this key as long as you append it with window. You
must always define the value as "webview.sourceVariableList".
<head>
    <meta charset="utf-8">
    <meta name="viewport" content="width=device-width, initial-scale=1, shrink-to-fit=no">
    <meta name="theme-color" content="#000000">
    <link rel="manifest" href="%PUBLIC_URL%/manifest.json">
    <link rel="shortcut icon" href="%PUBLIC_URL%/favicon.ico">

    <title>React App</title>
    <script>
        window.wvParams="webview.sourceVariableList";
    </script>
  </head>
In the app code example below:
- The
letstatement assignswebview.sourceVariableListtowvParams. - The output values get parsed as a JSON object.
fullnameextracts the name of the variable defined for thesourceVariableListproperty in the webview component (wherenameis the name of the variable defined).
class App extends Component {
    constructor(props) {
        super(props);

        let wvParams = (window.wvParams === "webview.sourceVariableList" ?
            [] : JSON.parse(window.wvParams)['parameters']);

        this.getParam = (arrParams, key, defaultValue) => {
            if (arrParams) {
                let param = arrParams.find(e => {
                    return e.key === key;
                });
                return param ? param.value : defaultValue;
            }
            return defaultValue;
        };

        fullname = getParam(wvParams, 'name', null);
        callbackurl = getParam(wvParams, 'webview.onDone', null);
    ...
Add Multiple Placehoders in the <head> Element
Add a <script> block that has placeholders for each value
defined for the SourceVariable component and the callback URL. The web
app returns the callback URL and the data for input parameters as a JSON-encoded string.
Because you've added placeholders, you don't have to declare a
window.webviewParameters['parameters'] variable.
- Match the input values defined for
SourceVariableproperty. - Be appended by
webview.(webview.keyword, for example).
webview.onDone. In the
following snippet, for example, webview.keyword,
webview.assignee, webview.inventor all match
sourceVariableList: "assignee, keyword, inventor". The callback URL
is defined with webview.onDone. You can name the callback key anything,
but you always need to define the value as webview.onDone.
You can optionally set global variables by appending the keys with window.
(window.Keyword in the following snippet, for example).
<head>
    <meta charset="utf-8">
    <meta name="viewport" content="width=device-width, initial-scale=1, shrink-to-fit=no">
    <meta name="theme-color" content="#000000">
    <link rel="manifest" href="%PUBLIC_URL%/manifest.json">
    <link rel="shortcut icon" href="%PUBLIC_URL%/favicon.ico">

<title>React App</title>
    <script>
        window.Keyword="webview.keyword";
        window.Assignee="webview.assignee";
        window.Inventor="webview.inventor";
        window.CALLBACK_URL="webview.onDone";
    </script>
</head>
Wire the Callback URL to a Done Button in the Web App
The callback URL that's generated by the System.Webview component
is essentially a single-use callback because of its state token
(https://...?state=<callback-state-token>). While it has a
default lifetime of an hour, it gets cleared after System.Webview
component handles the callback request from the web app. Because users won’t be able to
query the web app after this point, it should transition to an End page with a Close
button that’s wired to the callback URL.
Externally Hosted Webviews
You would host an app on external server if it has security requirements, leverages server-side infrastructure, or requires data integration or central administration. Remotely hosted web apps can be SPAs, but don't have to be. You can modify an existing web app to render as a webview or create a web app specifically for a skill.
- At runtime, the
System.Webviewcomponent sends the intermediary service a POST request that includes the skill’s callback URL and the user's input parameters as an array of key-value pairs. The component addswebview.onDonevariable as the callback URL key. The keys are the names of parameters that are referenced by both theSystem.Webview'ssourceVariableListproperty and thewebview.onDoneproperty.{ "parameters": [{ "value": "CDG", "key": "origin" }, { "value": "MUC", "key": "destination" }, { "value": "https://<url>:443/connectors/v2/callback?state=cb5443. ..2c" "key": "webview.onDone" }]Note
If you are using version 19.4.1 of Oracle Digital Assistant, the"value"entry is:"value": "https://<url>:443/connectors/v1/callback?state=cb5443. ..2c" - The intermediary service returns a JSON object to the skill that
has a single property,
webview.url. Its string defines the redirect URL to the web app, which is used by the subsequent GET request from the skill. This URL also contains the key-values passed from the POST request (unless the payload of the POST request is saved in a storage accessible to the web application). It might look something like:{ "webview.url": "https://<app url>?callbackURL=https://example.com:443/connectors/v2/callback?state=cb55435552c&origin=CDG&destination=MUC }NoteThe web app uses the callback URL in a call to pass control back to the skill, and optionally, to pass a response payload.
In version 19.4.1, it might look something like:{ "webview.url": "https://<app url>?callbackURL=https://example.com:443/connectors/v1/callback?state=cb55435552c&origin=CDG&destination=MUC }
This illustrates using the JQueryself.buttonClick = function (event) { if (event.currentTarget.id === 'Submit') { let data = {}; data.origin = self.origin(); data.destination = self.destination(); //return date in milliseconds data.departureDate = (new Date(self.departureDate())).getTime(); data.returnDate = (new Date(self.returnDate())).getTime(); data.status = "success" /* function jqueryPost(url, data) { return $.ajax({ contentType: "text/plain", url: url, data: data || {}, type: "POST", dataType: "text/plain" }); }; jqueryPost(webViewCallback, JSON.stringify(data)); */ //JQuery post call $.post(webViewCallback,JSON.stringify(data)); } else { //if user pressed "cancel" pass no data but a status informing the bot designer let data = {}; data.status = "cancel" $.post(webViewCallback, JSON.stringify(data)); }$.postmethod to return JSON object to the skill withorigin,destination,departureDate, andreturnDatekey value pairs:{ "origin":"CDC" "destination":"MUC" "departureDate":"15689736000000" "returnDate":"15689736000000" }Tip:
This snippet has a"status"property that's set to"success"or"cancel"to indicate that a user has completed work in the web app or canceled it. Users may close the browser before the callback request has completed, so include a listener for the closing that issues a callback if not yet happened. The call could use a status of"cancel"to indicate that the form wasn't completed successfully. If the user closes the window and you don't catch this, then the skill waits until it time out. - The skill launches the web app by sending a GET request to the URL
defined by the
webview.urlproperty. - After the webview processes the input, it sends a completion
callback, which is a POST request, to the callback URL that the
System.Webviewcomponent generated and provided to the intermediary service. This request not only signals that the app has finished (and that the skill should resume control of the session), but can return a payload of data, which gets stored in theSystem.Webview’svariableproperty.Depending on your hosting strategy, there are a couple of things to keep in mind:- If you host the web app and the intermediary service on the same web server, then the skill's request parameters can be saved into a session, thus eliminating the need for a long URL string.
- If you host the web app and the intermediary service on different servers, then all of the web app request parameters in the redirect URL that's sent to the skill must be encoded as query parameters.
Create a Webview Service
Configuring a Webview Service connects your skill to the service that hosts the webview app.
You create Webview Services from the Webview page, which is
accessed by first clicking Components (![]() ) in the left navbar, then clicking Webview. This page
lists the various Webview Services that you can reference in the
) in the left navbar, then clicking Webview. This page
lists the various Webview Services that you can reference in the
System.Webview's service property.
You don’t need to reconfigure a Digital Assistant-hosted service when you version or clone your skill. If you host the web app externally, however, you do need to reconfigure the service when you version or clone your skill.
Create a Digital Assistant-Hosted Webview Service
While you may need to provide authentication credentials as part of
configuring an externally-hosted Webview Service, you only need to package the web app
into a TAR archive (a TGZ file) and then upload it. The index.html file
must be at the root level of this file.
tar -zcvf webapp.tgz *-zcvf command creates a file called webapp.tgz. As
stated in Defining Placeholders in the index.html File, you can author the web app using your framework of choice as long as
the index.html file is at the root of the TGZ file. In fact, the
index.html can even be the only file at the root level.
- Enter the name of the services in the Name file and a description
(which is optional). The name that you enter here must match the value for the
serviceproperty of theSystem.Webviewcomponent. - Switch on the Service Hosted option.
- Drop the TGZ into the Package File field or browse to, and select, the TGZ file.
- Click Create.
Package Oracle Visual Builder Applications
You build and optimize your Oracle Visual Builder apps for Digital Assistant using the vb-build Grunt task. You can run this task locally, or as part of a build on Oracle Developer Cloud Service (DevCS).
- Ensure that you've configured its service connection to accommodate the limitations described in How Do I Integrate a Webview into a Skill? by choosing Direct (Bypass the proxy) and Allow Anonymous Access in the Oracle Visual Builder.
- If you're using Oracle Visual Builder to optimize the binary, then select
Push to Git. Otherwise, you can skip this step.
Refer to the Oracle Visual Builder Documentation to find out more about securing the Oracle Visual Builder app and integrating it into a Git repository.
Package the Oracle Visual Builder App Locally
To optimize and package your Oracle Visual Builder app locally:
- In the Oracle Visual Builder home page, select your app and then click Export without Data.
- Unzip the app.
- Run
npm installon the root folder (where both thepackage.jsonandGruntfile.jsfiles are located).Running
npm installretrieves thegrunt-vb-build npmpackage that's defind in thepackage.jsonfile. - Enter the following
parameters:
./node_modules/.bin/grunt vb-build \
--url=${serviceURL} \
--username=${username} \
--password=${password} \
--id=${id} --ver=${ver} \
--ver=<your visual app ID>\
--git-source=<local directory for sources>
Parameter Description urlYour Visual Builder instance URL. usernameYour user name for the Visual Builder instance. passwordYour password for the Visual Builder instance. idThe ID of the application. The application ID may be the same as the application name, but the application ID must be unique in your identity domain. verThe version of your application. gitSpecifies the location of the sources (if they are not located in your current folder). - After the build completes, navigate to the application directory (located with
in the
WebAppsdirectory). For example,build/optimized/webApps/financialDispute. - Run the GNU tar command (
tar -zcvf webapp.tgz
                        *
, for example).tar -zcvf webapp.tgz *
Package the App Using Oracle Developer Cloud Service
- Configure a build job in Oracle Cloud for the web app:
- Associate the job with Git by adding Git as the source control (your web app also needs to be integrated with a Git repository).
- Select a build template.
- Add string parameters that get passed into the build. These
parameters include:
- The application's service URL, ID, and version (which you can obtain from your Oracle Visual Builder instance)
- Your user and password (a Password Parameter)
- The optimization, such as Uglify2.
- For the build steps, add a shell script that begins with
npm installand passes in the default parameters to the Visual Builder Grunt Tasks, such asvb-build.npm install ./node_modules/.bin/grunt vb-build \ --url=${URL} \ --username=${username} \ --password=${password} \ --id=${id} --ver=${ver} \ --optimize=${optimize} \ --schema=dev \ - For the After Build configuration, configure archiving, by
choosing Artifact Archiver (selected from Add
After Build Action menu) and then enter
build*zipin the Files to Archive field.
- After the build completes, download the ZIP file and then extract
it. The
index.htmlfile is located within thewebappfolder (located in thewebappsdirectory). - Package the app into a TGZ file (
tar -zcvf webapp.tgz *, for example).
Create an Externally-Hosted Webview Service
- Name—The name for remote service.
Note
The name that you enter here must match the value for theserviceproperty of theSystem.Webviewcomponent. - Switch off the Service Hosted toggle.
- Web App URL—The base endpoint provided by a
web server that accepts the source parameters as the payload in a HTTP POST
request. For example,
https://example.oracle.com:3001/webviewParams. Enter the URL for the intermediary service when the web app and the intermediary service are hosted separately. - Auth Token—An authorization token that’s sent
with requests to the URL specified by the Web App Url
property. This property is the form of
Basic <token>orBearer <token>. This is an optional property - Query Parameters—A stringified JSON object whose key-value pairs are the query parameters that are appended to the POST request. This is an optional property.
Reference the Returned Data in the Dialog Flow
Because the values returned in the payload do not update any of the variable
values, the property names in the response payload don't need to match the variable
names defined in the sourceVariableList property.
${variable_property_name.value.Param}. In the following snippet,
the output data is referenced as
${outputfromweb.value.disputeReason}. webview:
component: "System.Webview"
properties:
sourceVariableList: "fullname, amount"
variable: "outputfromweb"
prompt: "Tap the link to file your dispute."
service: "DisputeFormService"
transitions:
next: "output"
output:
component: "System.Output"
properties:
text:" Thank you, ${fullname.value}, we've noted your response: ${outputfromweb.value.disputeReason}"System.Webview component, you can find out about the data returned
by the web app using the Skill Tester (System.Webview state, expand the System.Webview
component's variable definition in the Conversation window to examine
the returned values.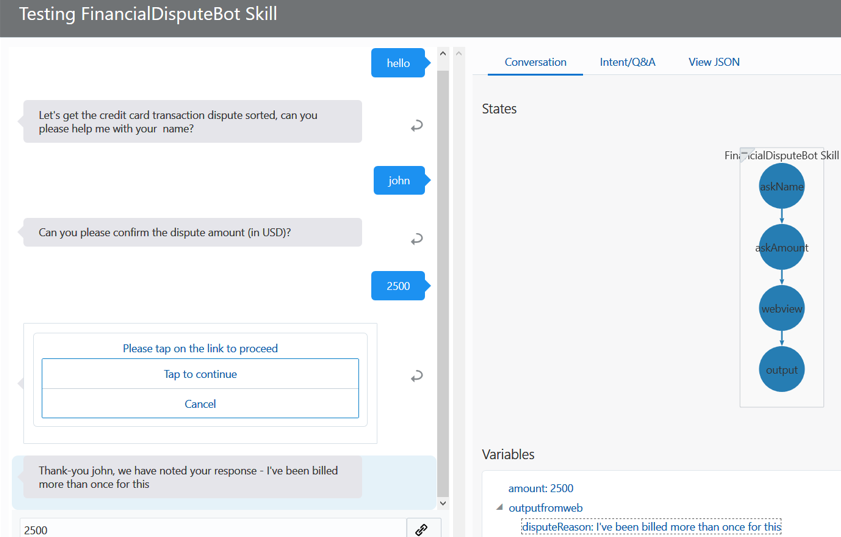
Tip:
Web app developers should ensure that the returned payload includes descriptive property names.Scenario: Integrating a Web App With a Skill
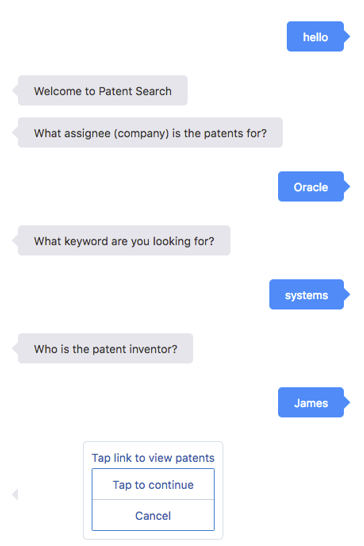
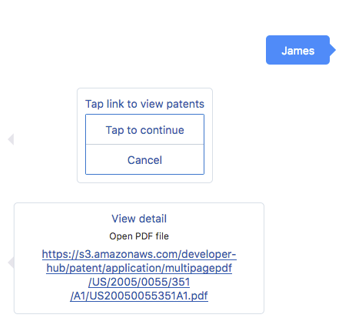
You want to develop a skill that lets users search for patents and open PDFs of the patents as follows:
-
After you awaken the skill by entering Hello, it prompts you for the patent query parameters: assignee, keyword, and inventor. Enter Oracle, systems, and James, respectively.
-
Choose Tap to continue to open the webview.
-
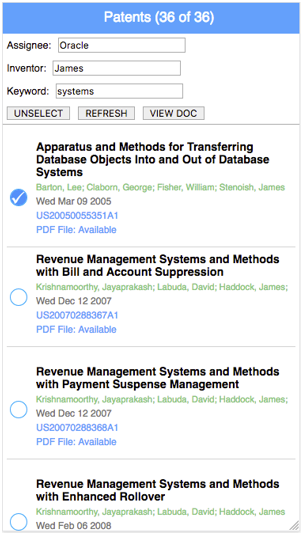
Choose a patent from the list and then click VIEW DOC.
-
Back in the skill conversation, tap Open PDF file.
Configure the index.html File
<script>
block:window.parameter="webview.value":
<title>React App</title>
<script>
window.Keyword="webview.keyword";
window.Assignee="webview.assignee";
window.Inventor="webview.inventor";
window.callback_url="webview.onDone";
</script>
</head>
PARAMETER_PLACEHOLDER and KEYWORD_PLACEHOLDER get
replaced with the actual values. The web app passes an output value back to the skill
through a POST call to the endpoint specified by the CALLBACK_URL
property.
If you hosted the file on an external web app server, the
index.html file would describe
the placeholders as follows:
<head>
    <meta charset="utf-8">
    <meta name="viewport" content="width=device-width, initial-scale=1, shrink-to-fit=no">
    <meta name="theme-color" content="#000000">
...
    <title>React App</title>
    <script>
        window.Keyword="__KEYWORD_PLACEHOLDER__";
        window.Assignee="__ASSIGNEE_PLACEHOLDER__";
        window.Inventor="__INVENTOR_PLACEHOLDER__";
        window.callback_url="__CALLBACK_URL_PLACEHOLDER__";
    </script>
  </head>
Configure the Dialog Flow to Pass Values to the Web App
-
Declare variables for
assignee,keyword, andinventor:variables: assignee: "string" keyword: "string" inventor: "string" instantAppOutput: "string" patentData: "string" patentFileLink: "string" iResult: "nlpresult" - Add System.Text
and System.SetVariable states that
prompt for these values and set
them:
askAssignee: component: "System.Text" properties: prompt: "What assignee (company) are the patents for?" variable: "assignee" transitions: next: "askKeyword" askKeyword: component: "System.Text" properties: prompt: "What keyword are you looking for?" variable: "keyword" transitions: next: "askInventor" askInventor: component: "System.Text" properties: prompt: "Who is the patent inventor?" variable: "inventor" transitions: next: "doSearch" startSearch: component: "System.Output" properties: text: "Searching patent..." keepTurn: true transitions: next: "setAssignee" setAssignee: component: "System.SetVariable" properties: variable: "assignee" value: "${iResult.value.entityMatches['Assignee'][0]}" transitions: next: "setKeyword" setKeyword: component: "System.SetVariable" properties: variable: "keyword" value: "${iResult.value.entityMatches['Keyword'][0]}" transitions: next: "startInventor" startInventor: component: "System.SetVariable" properties: variable: "inventor" value: "${iResult.value.entityMatches['Inventor'][0]}" transitions: ... - With the mechanism in place to collect and set these values, you define
your flow for the
System.Webviewcomponent (doSearchin the following snippet):doSearch: component: "System.Webview" properties: sourceVariableList: "assignee, keyword, inventor" variable: "patentData" prompt: "Tap link to view patents" service: "HostedWebservice1" transitions: ...Your component definition:-
Passes these values as input parameters (
sourceVariableList:
                    "assignee, keyword, inventor"
) to webview client app, whoseindex.htmlfile contains the corresponding value placeholders. The app uses these files to query to query the patent data using the US Patent Office’s public REST API. -
Sets the variable (
variable: "patentData") that holds the PDF link returned from the webview. -
Names the Webview Service (
HostedWebService1) that hosted the web app. Like all Webview Service names, this name is listed in the Webview tab of the Components page ( ).
).
-
- To allow users to view the PDF of the patent file, add states for the System.SetVariable component and the System.CommonResponse component:
- The
System.setVariablestate (savePatentFilein the following snippet) sets the value for thepatentFileLinkusing a value expression that extracts the PDF value from thepatentDatavariable (${patentData.value.url}). - The
System.CommonResponsestate (showFileLink) referencespatentFileLinkto display the PDF URL as a hyperlink (cardUrl: "${patentFileLink}") in a card response.
savePatentFile: component: "System.SetVariable" properties: variable: "patentFileLink" value: "${patentData.value.url}" transitions: next: "showFileLink" showFileLink: component: "System.CommonResponse" properties: processUserMessage: true metadata: responseItems: - type: "cards" cardLayout: "vertical" cards: # must have title, cardUrl, and one additional property for card to work in FB Messenger - title: "View detail" description: "Open PDF file" cardUrl: "${patentFileLink}" - The