Free Tier: Install Spring Boot on an Oracle Linux Instance

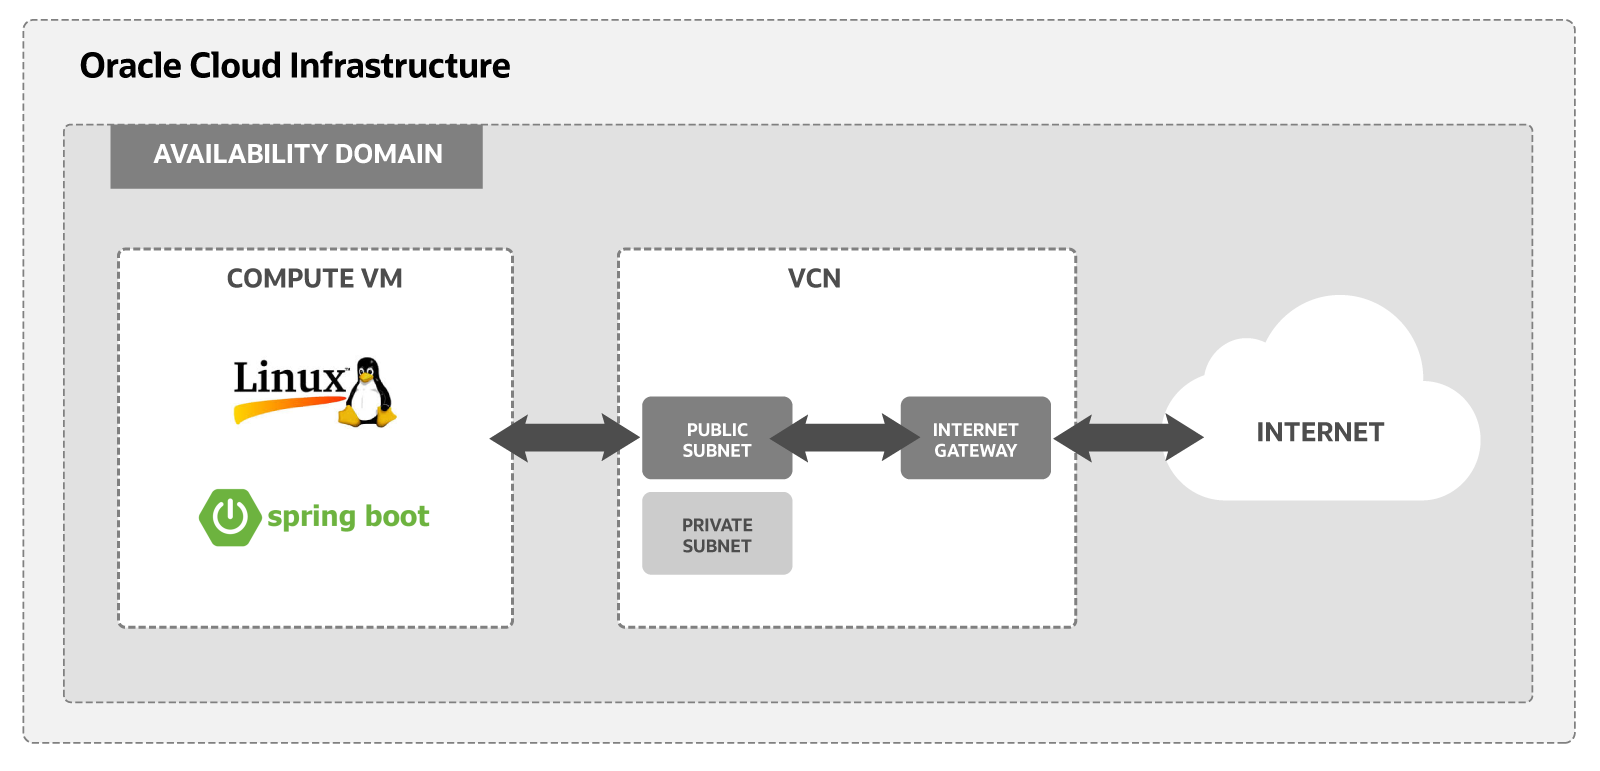
In this tutorial, use an Oracle Cloud Infrastructure Free Tier account to set up an Oracle Linux compute instance. Then, install a Spring Boot application and access your new app from the internet. Finally, this tutorial covers all the steps necessary to set up a virtual network for your host and connect the host to the internet.

Key tasks include how to:

  • Set up a compartment for your development work.
  • Install your Oracle Linux instance and connect it to your Virtual Cloud Network (VCN).
    • Set up an Oracle Cloud Infrastructure virtual cloud network and related network services required for your host to connect to the internet.
    • Set up ssh encryption keys to access your Oracle Linux Server.
  • Configure ingress rules for your VCN.
  • Configure Spring Boot on your instance.
  • Connect to your instance from the internet.

Here is a simplified diagram of the setup for your Linux instance.

A diagram of the components needed to run a Spring Boot app on Oracle Cloud Infrastructure

For additional information, see:

Before You Begin

To successfully complete this tutorial, you must have the following:

Requirements
  • An Oracle Cloud Infrastructure Free Tier account. Start for free.
  • A MacOS, Linux, or Windows computer with ssh support installed.

1. Set up a Compartment for Development

Configure a compartment for your development.

Create a Compartment

Create a compartment for the resources that you create in this tutorial.

  1. Sign in to the Oracle Cloud Infrastructure Console.
  2. Open the navigation menu and click Identity & Security. Under Identity, click Compartments.
  3. Click Create Compartment.
  4. Fill in the following information:
    • Name: <your-compartment-name>
    • Description: Compartment for <your-description>.
    • Parent Compartment: <your-tenancy>(root)
  5. Click Create Compartment.

Reference: Create a compartment

2. Install an Oracle Linux Instance

Use the Create a VM Instance workflow to create a new compute instance.

The workflow does several things when installing the instance:

  • Creates and installs a compute instance running Oracle Linux.
  • Creates a VCN with the required subnet and components needed to connect the Oracle Linux instance to the internet.
  • Creates an ssh key pair you use to connect to the instance.
Review Installation Steps

To get started installing an instance with the Create a VM instance workflow, follow these steps:

Important

The steps provided are for a Free Tier account. If you are using a paid account, the steps might differ from those shown here.
  1. Click the Oracle Cloud icon to go to the main landing page.
    • Scroll down to Launch Resources.
    • Select Create a VM instance workflow.
    The Create compute instance page is displayed. The page sections include
    • Name and Compartment
    • Placement
    • Security
    • Image and shape
    • Networking
    • Add SSH keys
    • Boot volume
  2. Choose the Name and Compartment.

    Initial Options

    • Name: <name-for-the-instance>
    • Create in compartment: <your-compartment-name>

    Enter a value for the name or use the system supplied default. For compartment, select the default root compartment.

  3. Review the Placement settings.
    • Take the default values. An availability domain is assigned to you.

    The data might look similar to the following:

    Availability domain

    • Availability domain: AD-1
    • Capacity type: On-demand capacity
    • Fault domain: Let Oracle choose the best fault domain
    Note

    For Free Tier, use the Always Free Eligible option for availability domain.
  4. Review the Security settings.
    • Take the default settings.

    The data looks similar to the following:

    Security

    • Shielded instance: Disabled
    • Confidential computing: Disabled
  5. Review the Image and shape settings. Take the default values provided by the workflow.
    Note

    The following is sample data for an AMD virtual machine. The actual values might differ.

    Image

    • Image: Oracle Linux 8
    • Image build: <current-build-date>
    • Shape: VM.Standard.E2.1.Micro
    • OCPU: 1
    • Memory (GB): 1
    • Network bandwidth (Gbps): 0.48
    Note

    For Free Tier, use Always Free Eligible shape options.
  6. Review the Networking settings. Make the following changes to the default.
    • Click Edit.
    • Primary Network: Select Create new virtual cloud network.
    • New virtual cloud network name: Take the generated VCN name or provide your own name.
    • Create in compartment: <root-for-your-tenancy>.
    • Subnet: Select Create new public subnet.
    • New subnet name: Take the generated subnet name or provide your own name.
    • Create in compartment: <root-for-your-tenancy>.
    • CIDR block: Take the default value (for example, 10.0.0.0/24).
    • Public IPv4 address, take the default value of Assign a public IPv4 address.
    • Continue to the next section.
  7. Review the Add SSH keys settings. Take the default values provided by the workflow.
    • Select the Generate a key pair for me option.
    • Click Save Private Key and Save Public Key to save the private and public SSH keys for this compute instance.

    If you want to use your own SSH keys, select one of the options to provide your public key.

    Note

    Put your private and public key files in a safe location. You can't retrieve keys again after the compute instance has been created.
  8. Review the Boot volume settings. Take the default values provided by the workflow.

    Leave the Use in-transit encryption setting checked.

  9. Click Create to create the instance. Provisioning the system might take several minutes.
You have successfully created an Oracle Linux instance to run an Apache Web Server.

3. Enable Internet Access

The Create a VM Instance wizard automatically creates a VCN for your instance. You add an ingress rule to your subnet to allow internet connections on port 8080.

Create an Ingress Rule for your VCN

Follow these steps to select your VCN's public subnet and add the ingress rule.

  1. Open the navigation menu and click Networking, and then click Virtual Cloud Networks.
  2. Select the VCN you created with your compute instance.
  3. With your new VCN displayed, click <your-subnet-name> subnet link.

    The public subnet information is displayed with the Security Lists at the bottom of the page. A link to the Default Security List for your VCN is displayed.

  4. Click the Default Security List link.

    The default Ingress Rules for your VCN are displayed.

  5. Click Add Ingress Rules.

    An Add Ingress Rules dialog is displayed.

  6. Fill in the ingress rule with the following information.

    Fill in the ingress rule as follows:

    • Stateless: Checked
    • Source Type: CIDR
    • Source CIDR: 0.0.0.0/0
    • IP Protocol: TCP
    • Source port range: (leave-blank)
    • Destination Port Range: 8080
    • Description: Allow HTTP connections
  7. Click Add Ingress Rules.
    Now HTTP connections are allowed. Your VCN is configured for Spring Boot.
You have successfully created an ingress rule that makes your instance available from the internet.

4. Install and Configure Spring Boot

Next, install all the software needed for your Spring Boot application.

Configure the Port for your Instance
  1. Open the navigation menu and click Compute. Under Compute, click Instances.
  2. Click the link to the instance you created in the previous step.

    From the Instance Details page look under the Instance Access section. Write down the public IP address the system created for you. You use this IP address to connect to your instance.

  3. Open a Terminal or Command Prompt window.
  4. Change into the directory where you stored the ssh encryption keys you created.
  5. Connect to your instance with this SSH command
    ssh -i <your-private-key-file> opc@<x.x.x.x>

    Since you identified your public key when you created the instance, this command logs you into your instance. You can now issue sudo commands to install and start your server.

  6. Enable an HTTP connection on port 8080.
    sudo firewall-cmd --permanent --add-port=8080/tcp
    sudo firewall-cmd --reload

The firewall is configured for Spring Boot.

Install Git

Install Git v2 using the IUS Community Project (https://ius.io/). Navigate to the current version of Git core package and download to a ~/temp directory.

  1. For example, downloading the Git RPM looks similar to the following.
    cd
    mkdir temp
    cd ~/temp
    wget https://repo.ius.io/7/x86_64/packages/g/git224-core-2.24.2-1.el7.ius.x86_64.rpm                        
    
  2. Install the RPM with yum.
    sudo yum install git224-core-2.24.2-1.el7.ius.x86_64.rpm
  3. Test result.
    git --version
    git version 2.24.2

Git is installed.

Install JDK 8
  1. Install OpenJDK 8 using yum.
    sudo yum install java-1.8.0-openjdk-devel
    java -version
  2. Set JAVA_HOME in .bashrc.

    Update the file:

    vi ~/.bashrc

    In the file, append the following text and save the file:

    # set JAVA_HOME
    export JAVA_HOME=/etc/alternatives/java_sdk

    Activate the preceding command in the current window.

    source ~/.bashrc

Java is installed.

Install Maven 3.6

Install Maven from an Apache mirror. Go to the main Maven site's (https://maven.apache.org/) download page. Get the URL for the latest version and download with wget.

  1. Download the Maven zip file, for example:
    wget http://apache.mirrors.pair.com/maven/maven-3/3.6.3/binaries/apache-maven-3.6.3-bin.tar.gz
  2. Extract the program files.
    sudo tar xvfz apache-maven-3.6.3-bin.tar.gz
  3. Install the program files by moving the files to the /opt directory.
    sudo mv apache-maven-3.6.3 /opt/
  4. Add the Maven path /opt/apache-maven-3.6.3/bin to your PATH environment variable and source your .bashrc.
    vi ~/.bashrc
    export PATH=$PATH:/opt/apache-maven-3.6.3/bin
    source ~/.bashrc
                        

Maven is ready to use.

Build Your Spring Boot Application

Follow these steps to set up your Spring Boot application:

  1. From your home directory check out the Spring Boot Docker guide with Git:
    git clone http://github.com/spring-guides/gs-spring-boot-docker.git
  2. Change into the gs-spring-boot-docker/initial directory.
  3. Edit the Application.java file: src/main/java/hello/Application.java.
  4. Update the code with the following:
    
    package hello;
    
    import org.springframework.boot.SpringApplication;
    import org.springframework.boot.autoconfigure.SpringBootApplication;
    import org.springframework.web.bind.annotation.RequestMapping;
    import org.springframework.web.bind.annotation.RestController;
    
    @SpringBootApplication
    @RestController
    public class Application {
    
        @RequestMapping
        public String home(){
            return "<h1>Spring Boot Hello World!</h1>";
        }
        
        public static void main(String[] args) {
            SpringApplication.run(Application.class, args);
        }
        
    }
                        
  5. Save the file.
  6. Use Maven to build the application.
    mvn package

    You get a message of success.

    [INFO] BUILD SUCCESS
  7. Run the application.
    java -jar target/gs-spring-boot-docker-0.1.0.jar
  8. Test your application from the command line or a browser.
    • From a new terminal, connect to your instance with your SSH keys and test with curl:
      curl -X GET http://localhost:8080
    • From your browser connect to the public IP address assigned to your instance: http://<x.x.x.x>:8080.

    On your instance or in your browser, you see Spring Boot Hello World!

Congratulations! You have successfully created a Spring Boot application on your instance.