Kubernetes: Deploy a Java Helidon Application
In this tutorial, you use an Oracle Cloud Infrastructure account to set up a Kubernetes cluster. Then, you deploy a Java Helidon application to your cluster.
Key tasks include how to:
- Set up a Kubernetes cluster on OCI.
- Set up OCI CLI to access your cluster.
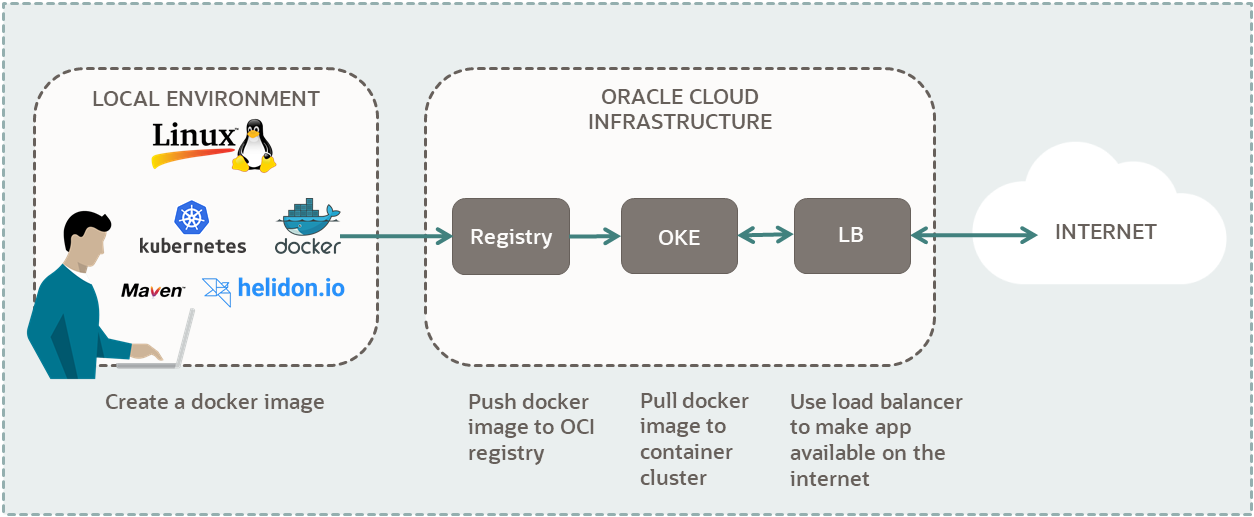
- Build a Java Helidon application and Docker Image.
- Push your image to OCI Container Registry.
- Deploy your Docker application to your cluster.
- Connect to your application from the internet.
For additional information, see:
Before You Begin
To successfully perform this tutorial, you must have the following:
- For Container Registry, Kubernetes and Load Balancers:
- A paid Oracle Cloud Infrastructure account.
- See Signing Up for Oracle Cloud Infrastructure.
- For building applications and Docker images:
- One of the following local environments:
- A MacOS or Linux machine.
- A Windows machine with Linux support. For example:
- The following applications on your local environment:
- JDK 11 and set JAVA_HOME in .bashrc.
- Python 3.6.8+ and pip installer for Python 3
- Kubernetes Client 1.11.9+
- Apache Maven 3.0+
- Docker 19.0.3+
- Git 1.8+
- One of the following local environments:
If you don't want to set up the required applications on your local environment, you can use Oracle Cloud Infrastructure Cloud Shell instead. The advantage of using Cloud Shell is all the required tools to manage your application are already installed and ready to use. Follow the steps in:
Kubernetes Using Cloud Shell: Deploy a Java Helidon Application
If you want to use an OCI Free Tier Linux compute instance to manage your deployment, the following sections provide information to get the required software installed.
- Install a Linux VM with an Always Free compute shape, on Oracle Cloud
Infrastructure. You will need a machine with
sshsupport to connect to your Linux instance.- Install an Oracle Linux VM
- Follow sections 2 and 3.
- If you have a paid account, for section 2, choose your compute options based on your offerings.
- To connect to your instance, in section 4, follow steps 1-5.
- Skip the Apache instructions.
- Install an Ubuntu VM
- Follow sections 2 and 3.
- If you have a paid account, for section 2, choose compute options based on your offerings.
- To connect to your instance, in section 4, follow steps 1-5.
- Skip the Apache instructions.
- To update the firewall settings, in section 4, perform step 8.
- Install an Oracle Linux VM
- Verify your current installation:
java -version - To install JDK 11, run the following commands:
- Oracle Linux:
sudo yum updateyum list jdk*sudo yum install -y <jdk-version-of-your-choice> - Ubuntu:
sudo apt updatesudo apt install -y openjdk-11-jdk-headless
- Oracle Linux:
- Verify the installation.
java -version - Set
JAVA_HOMEin.bashrc.Update the file:
vi .bashrcIn the file, append the following text and save the file:
# set JAVA_HOME
export JAVA_HOME=<path-to-jdk>
Examples:
# set JAVA_HOME in Oracle Linux
export JAVA_HOME=/usr/java/jdk-11.0.10
# set JAVA_HOME in Ubuntu export JAVA_HOME=/usr/lib/jvm/java-11-openjdk-amd64 - Activate the preceding command in the current window.
source ~/.bashrc
- Verify your current
installation.
python3 --version - For Python 3, run the following commands:
- Oracle Linux:
sudo yum updatesudo yum install -y python3 - Ubuntu:
sudo apt updatesudo apt install -y python3
- Oracle Linux:
- Verify the pip installation for
Python3.
pip3 -VExample output if pip for Python3 is installed:
pip <version> from xxx/lib/python3.x/site-packages/pip (python 3.x) - To install pip for Python 3, run the following commands:
- Oracle Linux:
sudo yum updatesudo yum install -y python3-pip - Ubuntu:
sudo apt updatesudo apt install -y python3-pip
- Oracle Linux:
- Verify the pip for Python 3
installation.
pip3 -V
- Verify your current installation:
kubectl version --clientIf you have Kubernetes, then the version is<major-version>.<minor-version>. For example, for version 1.20, you get the following:version.Info{Major:"1", Minor:"20"... - To install he
kubectlclient, refer to the following links: - Verify the installation.
kubectl version --client
- Verify your current
installation.
mvn --version - To install Apache Maven, refer to the following links:
- Verify the installation.
mvn --version
- Verify your current installation:
docker -v - Oracle Linux
To install Docker on Oracle Linux, run the following commands.
sudo yum install docker-enginesudo systemctl start dockersudo systemctl enable dockerNote: The last command enables Docker to start on reboots.
- Ubuntu Linux
To install Docker on Ubuntu Linux, refer to the following link: Get Docker
- Verify the installation.
docker -v
1. Prepare
Prepare your environment to create and deploy your application.
- Log in to the Oracle Cloud Infrastructure Console.
- Open the navigation menu, and click Governance and Administration. Under Governance, click Limits, Quotas and Usage.
- Find your service limit for Regions:
- Filter for the following options:
- Service: Regions
- Scope: Tenancy
- Resource: Subscribed region count
- Compartment:
<tenancy-name>(root)
- Find service limit:
- Limit Name:
subscribed-region-count - Service Limit: minimum 2
- Limit Name:
- Filter for the following options:
- Find your available Compute
core count for the VM.Standard.E3.Flex shape:
- Filter for the following options:
- Service: Compute
- Scope:
<first-availability-domain>. Example:EMlr:US-ASHBURN-AD-1 - Resource: Cores for Standard.E3.Flex and BM.Standard.E3.128 Instances
- Compartment:
<tenancy-name>(root)
- Find available core count:
- Limit Name:
standard-e3-core-ad-count - Available: minimum 1
- Limit Name:
- Repeat for Scope:
<second-availability-domain>and<third-availability-domain>. Each region must have at least one core available for this shape.
- Filter for the following options:
- Find out if you have 50 GB of Block Volume available:
- Filter for the following options:
- Service: Block Volume
- Scope:
<first-availability-domain>. Example:EMlr:US-ASHBURN-AD-1 - Resource Volume Size (GB)
- Compartment:
<tenancy-name>(root)
- Find available block volume storage:
- Limit Name:
total-storage-gb - Available: minimum 50
- Limit Name:
- Repeat for Scope:
<second-availability-domain>and<third-availability-domain>. Each region must have at least 50 GB of block volume available.
- Filter for the following options:
- Find out how many Flexible Load Balancers you have available:
- Filter for the following options:
- Service: LbaaS
- Scope:
<your-region>. Example:us-ashburn-1 - Resource:
<blank> - Compartment:
<tenancy-name>(root)
- Find the number of available flexible load balancers:
- Limit Name:
lb-flexible-count - Available: minimum 1
- Limit Name:
- Filter for the following options:
This tutorial creates three compute instances with a VM.Standard.E3.Flex shape for the cluster nodes. To use another shape, filter for its core count. For example, for VM.Standard2.4, filter for Cores for Standard2 based VM and BM Instances and get the count.
For a list of all shapes, see VM Standard Shapes.
This tutorial uses a 'Quick Create' workflow to create a cluster with a public regional subnet that hosts a flexible load balancer. To use a different load balancer, you can use a custom workflow to explicitly specify which existing network resources to use, including the existing subnets in which to create the load balancers.
To use another bandwidth for the load balancer, filter for its count, for example 100-Mbps bandwidth or 400-Mbps bandwidth.
- In the Console's top navigation bar, click the Profile menu (your avatar).
- Click your username.
- Click Auth Tokens.
- Click Generate Token.
- Give it a description.
- Click Generate Token.
- Copy the token and save it.
- Click Close.
Ensure that you save your token right after you create it. You have no access to it later.
The Python virtualenv creates a folder that contains all the
executables and libraries for your project.
The virtualenvwrapper is an extension to virtualenv.
It provides a set of commands, which makes working with virtual environments much
more pleasant. It also places all your virtual environments in one place. The
virtualenvwrapper provides tab-completion on environment
names.
- Install
virtualenv.pip3 install --user virtualenv - Install
virtualenvwrapper.pip3 install --user virtualenvwrapper - Find the location of the
virtualenvwrapper.shscript.grep -R virtualenvwrapper.shExample paths:- Linux example:
/home/ubuntu/.local/bin/virtualenvwrapper.sh - MacOS example:
/usr/local/bin/virtualenvwrapper.sh
- Linux example:
- Configure the virtual environment wrapper in
.bashrc.sudo vi .bashrcAppend the following text.
# set up Python env
export WORKON_HOME=~/envs
export VIRTUALENVWRAPPER_PYTHON=/usr/bin/python3
export VIRTUALENVWRAPPER_VIRTUALENV_ARGS=' -p /usr/bin/python3 '
source <path-to-virtualenvwrapper.sh>
Replace
<path-to-virtualenvwrapper.sh>with its value.Based on the location of Python3 binaries in your environment, update
/usr/bin/python3to its correct location.Save the file.
- Activate the commands in the current
window.
source ~/.bashrcExample output:virtualenvwrapper.user_scripts creating /home/ubuntu/envs/premkproject virtualenvwrapper.user_scripts creating /home/ubuntu/envs/postmkproject virtualenvwrapper.user_scripts creating /home/ubuntu/envs/initialize virtualenvwrapper.user_scripts creating /home/ubuntu/envs/premkvirtualenv virtualenvwrapper.user_scripts creating /home/ubuntu/envs/postmkvirtualenv virtualenvwrapper.user_scripts creating /home/ubuntu/envs/prermvirtualenv virtualenvwrapper.user_scripts creating /home/ubuntu/envs/postrmvirtualenv virtualenvwrapper.user_scripts creating /home/ubuntu/envs/predeactivate virtualenvwrapper.user_scripts creating /home/ubuntu/envs/postdeactivate virtualenvwrapper.user_scripts creating /home/ubuntu/envs/preactivate virtualenvwrapper.user_scripts creating /home/ubuntu/envs/postactivate
- Start a virtual
environment.
workon cli-app - Confirm that the name of your virtual environment,
cli-appappears in the left of your command prompt.Example:
(cli-app) ubuntu@<ubuntu-instance-name>:~$ - Install OCI
CLI.
pip3 install oci-cli - Test the
installation:
oci --versionIf everything is set up correctly, you get the version.
oci --help
- Enter the following command in your virtual
environment:
oci setup config - Enter your answers from the Gather Required Information section:
- Location for your config [$HOME/.oci/config]:
<take-default> - User OCID:
<user-ocid> - Tenancy OCID:
<tenancy-ocid> - Region (e.g. us-ashburn-1):
<region-identifier>
- Location for your config [$HOME/.oci/config]:
- Enter the following information to set up your OpenSSL API encryption keys:
- Generate a new API Signing RSA key pair? [Y/n]: Y
- Directory for your keys [$HOME/.oci]:
<take-default> - Name for your key [oci_api_key]
<take-default>
- Deactivate the virtual environment:
deactivateThe
(cli-app)prefix in your environment is not displayed anymore.
Your private key is
oci_api_key.pem and your public key is
oci_api_key_public.pem.- Activate the
cli-appenvironment:workon cli-app - Display the public
key.
cat $HOME/.oci/oci_api_key_public.pem - Copy the public key.
- Add the public key to your user account:
- Go to the Console.
- Click your Profile menu (your avatar), and then click User Settings.
- Click API Keys.
- Click Add API Key.
- Click Paste Public Key.
- Paste value from previous step, including the lines with
BEGIN PUBLIC KEYandEND PUBLIC KEY. - Click Add.
- Whenever you want to use the OCI CLI, activate it with:
workon cli-app - When you change project names,
workondeactivates your current working environment. This way, you can quickly switch between environments.
2. Set Up a Cluster
Install and configure management options for your Kubernetes cluster. Later, deploy your application to this cluster.
If your username is in the Administrators group, then skip this section. Otherwise, have your administrator add the following policy to your tenancy:
allow group <the-group-your-username-belongs> to manage compartments in tenancyWith this privilege, you can create a compartment for all the resources in your tutorial.
- In the top navigation bar, open the Profile menu.
- Click your username.
- In the left pane, click Groups.
- In a notepad, copy the Group Name that your username belongs.
- Open the navigation menu and click Identity & Security. Under Identity, click Policies.
- Select your compartment from the Compartment drop-down.
- Click Create Policy.
- Fill in the following information:
- Name:
manage-compartments - Description:
Allow the group <the-group-your-username-belongs> to list, create, update, delete and recover compartments in the tenancy. - Compartment:
<your-tenancy>(root)
- Name:
- For Policy Builder, click Show manual editor.
- Paste in the following policy:
allow group <the-group-your-username-belongs> to manage compartments in tenancy - Click Create.
Reference: The compartments resource-type in Verbs + Resource-Type Combinations for IAM
Create a compartment for the resources that you create in this tutorial.
- Sign in to the Oracle Cloud Infrastructure Console.
- Open the navigation menu and click Identity & Security. Under Identity, click Compartments.
- Click Create Compartment.
- Fill in the following information:
- Name:
<your-compartment-name> - Description:
Compartment for <your-description>. - Parent Compartment:
<your-tenancy>(root)
- Name:
- Click Create Compartment.
Reference: Create a compartment
If your username is in the Administrators group, then skip this section. Otherwise, have your administrator add the following policy to your tenancy:
allow group <the-group-your-username-belongs> to manage all-resources in compartment <your-compartment-name>With this privilege, you can manage all resources in your compartment, essentially giving you administrative rights in that compartment.
- Open the navigation menu and click Identity & Security. Under Identity, click Policies.
- Select your compartment from the Compartment drop-down.
- Click Create Policy.
- Fill in the following information:
- Name:
manage-<your-compartment-name>-resources - Description:
Allow users to list, create, update, and delete resources in <your-compartment-name>. - Compartment:
<your-tenancy>(root)
- Name:
- For Policy Builder, select the following choices:
- Policy use cases:
Compartment Management - Common policy templates:
Let compartment admins manage the compartment - Groups:
<the-group-your-username-belongs> - Location:
<your-tenancy>(root)
- Policy use cases:
- Click Create.
Reference: Common Policies
Create a cluster with default settings and new network resources through the 'Quick Create' workflow.
After you create a Kubernetes cluster, set up your local system to access the cluster.
With your cluster access set up, you are now ready to prepare your application for deployment.
3. Build a Local Application
Build a local application and a Docker image for the application.
Create your Java Helidon application.
You have successfully built the Helidon application.
Run your Java Helidon application.
You have successfully created a Hello World application using the Helidon MicroProfile service.
References:
- For detailed information on this example, see Helidon MP Quick Start.
- To create your own application, see Helidon MP Config Guide.
Next, create a Docker image for your Helidon application.
4. Deploy Your Docker Image
Push your Helidon Docker image to OCI Container Registry. Then use the image to deploy your application.
With your local Docker image created, push the image to the Container Registry.
Follow these steps.
Find your image in Container Registry after the push command is complete.
What's Next
You have successfully created a Helidon MicroProfile Hello World application, deployed it to a Kubernetes cluster, and accessed the app from the internet.
Check out these sites to explore more information about development with Oracle products: