Free Tier: Install Flask on an Ubuntu VM

In this tutorial, you use an Oracle Cloud Infrastructure Free Tier account to set up an Ubuntu instance. Then, you set up a virtual environment for your host. Finally, you install Flask, a lightweight web application framework for Python.

Key tasks include how to:

  • Set up a compartment for your development work.
  • Install your Ubuntu Linux instance and connect it to your Virtual Cloud Network (VCN).
    • Set up an Oracle Cloud Infrastructure virtual cloud network and related network services required for your host to connect to the internet.
    • Set up ssh encryption keys to access your Ubuntu Linux Server.
  • Configure ingress rules for your VCN.
  • Install Flask on your VM.
  • Create a Hello World Python application.
  • Test your application.

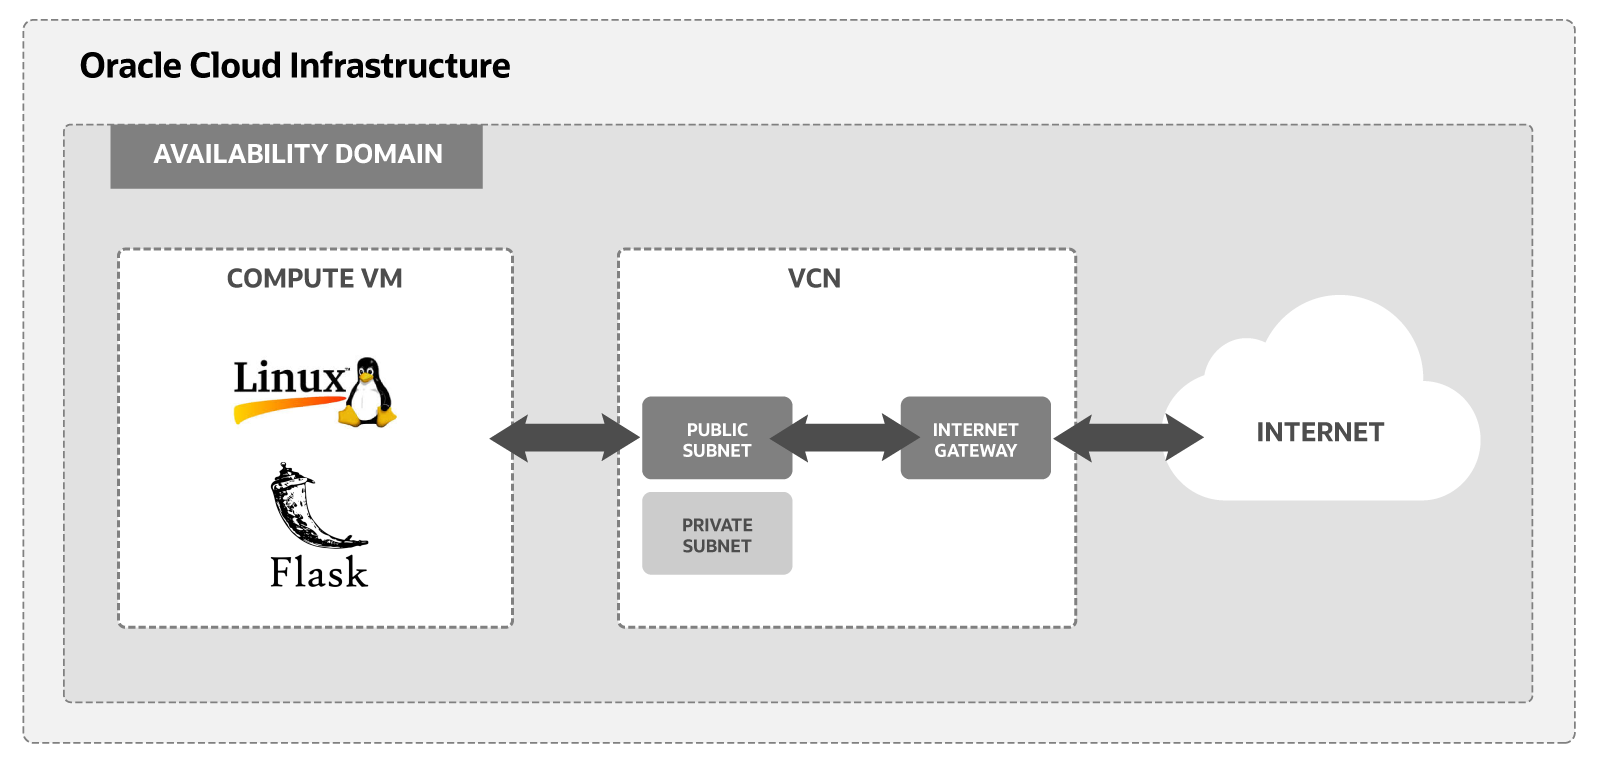
Here is a simplified diagram of the setup for your Linux VM.

A diagram of the components needed to run a Flask web application framework on Oracle Cloud Infrastructure

For additional information, see:

Before You Begin

To successfully complete this tutorial, you must have the following:

Requirements
  • An Oracle Cloud Infrastructure Free Tier account. Start for free.
  • A MacOS, Linux, or Windows computer with ssh support installed.

1. Set up a Compartment for Development

Configure a compartment for your development.

Create a Compartment

Create a compartment for the resources that you create in this tutorial.

  1. Sign in to the Oracle Cloud Infrastructure Console.
  2. Open the navigation menu and click Identity & Security. Under Identity, click Compartments.
  3. Click Create Compartment.
  4. Fill in the following information:
    • Name: <your-compartment-name>
    • Description: Compartment for <your-description>.
    • Parent Compartment: <your-tenancy>(root)
  5. Click Create Compartment.

Reference: Create a compartment

2. Install an Ubuntu Linux Instance

Use the Create a VM Instance workflow to create a new compute instance.

The workflow does several things when installing the instance:

  • Creates and installs a compute instance running Ubuntu Linux.
  • Creates a VCN with the required subnet and components needed to connect the Ubuntu Linux instance to the internet.
  • Creates an ssh key pair you use to connect to the instance.
Review Installation Steps

To get started installing an instance with the Create a VM instance workflow, follow these steps:

Important

The steps provided are for a Free Tier account. If you are using a paid account, the steps might differ from those shown here.
  1. Click the Oracle Cloud icon to go to the main landing page.
    • Scroll down to Launch Resources.
    • Select Create a VM instance workflow.
    The Create compute instance page is displayed. The page sections include
    • Name and Compartment
    • Placement
    • Security
    • Image and shape
    • Networking
    • Add SSH keys
    • Boot volume
  2. Choose the Name and Compartment.

    Initial Options

    • Name: <name-for-the-instance>
    • Create in compartment: <your-compartment-name>

    Enter a value for the name or use the system supplied default. For compartment, select the compartment you created.

  3. Review the Placement settings.
    • Take the default values. An availability domain is assigned to you.

    The data might look similar to the following:

    Availability domain

    • Availability domain: AD-1
    • Capacity type: On-demand capacity
    • Fault domain: Let Oracle choose the best fault domain
    Note

    For Free Tier, use the Always Free Eligible option for availability domain.
  4. Review the Security settings.
    • Take the default settings.

    The data might look similar to the following:

    Security

    • Shielded instance: Disabled
    • Confidential computing: Disabled
  5. Review the Image and shape settings. Change the operating system image.
    • Click Edit.
    • Click Change Image.
    • Click Ubuntu.
    • Select Canonical Ubuntu 22.04 or a later version.
    • Click Select Image.
    Note

    The following is sample data for an AMD virtual machine. The actual values might differ.

    Image and shape

    • Image: Canonical Ubuntu 22.04
    • Image build: <current-build-date>
    • Shape: VM.Standard.E2.1.Micro
    • OCPU: 1
    • Memory (GB): 1
    • Network bandwidth (Gbps): 0.48
    Note

    For Free Tier, use Always Free Eligible shape options.
    • Continue to the next section.
  6. Review the Networking settings. Make the following changes to the default.
    • Click Edit.
    • Primary Network: Select Create new virtual cloud network.
    • New virtual cloud network name: Take the generated VCN name or provide a name.
    • Create in compartment: <your-compartment-name>.
    • Subnet: Select Create new public subnet.
    • New subnet name: Take the generated subnet name or provide a name.
    • Create in compartment: <your-compartment-name>.
    • CIDR block: Take the default value (for example, 10.0.0.0/24).
    • Public IPv4 address, take the default value of Assign a public IPv4 address.
    • Continue to the next section.
  7. Review the Add SSH keys settings. Take the default values provided by the workflow.
    • Select the Generate a key pair for me option.
    • Click Save Private Key and Save Public Key to save the private and public SSH keys for this compute instance.

    If you want to use your own SSH keys, select one of the options to provide your public key.

    Note

    Put your private and public key files in a safe location. You can't retrieve keys again after the compute instance has been created.
  8. Review the Boot volume settings.

    Uncheck the Specify a customer boot volume size setting.

    Check the Use in-transit encryption setting.

    Uncheck the Encrypt this volume with a key that you manage setting.

  9. Click Create to create the instance. Provisioning the system might take several minutes.
You have successfully created an Ubuntu Linux instance.

3. Enable Internet Access

The Create a VM Instance wizard automatically creates a VCN for your VM. You add an ingress rule to your subnet to allow internet connections on port 5000.

Create an Ingress Rule for your VCN

Follow these steps to select your VCN's public subnet and add the ingress rule.

  1. Open the navigation menu and click Networking, and then click Virtual Cloud Networks.
  2. Select the VCN you created with your compute instance.
  3. With your new VCN displayed, click <your-subnet-name> subnet link.

    The public subnet information is displayed with the Security Lists at the bottom of the page. A link to the Default Security List for your VCN is displayed.

  4. Click the Default Security List link.

    The default Ingress Rules for your VCN are displayed.

  5. Click Add Ingress Rules.

    An Add Ingress Rules dialog is displayed.

  6. Fill in the ingress rule with the following information.

    Fill in the ingress rule as follows:

    • Stateless: Checked
    • Source Type: CIDR
    • Source CIDR: 0.0.0.0/0
    • IP Protocol: TCP
    • Source port range: (leave-blank)
    • Destination Port Range: 5000
    • Description: Allow HTTP connections

    Click Add Ingress Rule. Now HTTP connections are allowed. Your VCN is configured for Apache server.

  7. Click Add Ingress Rules.
    Now HTTP connections are allowed. Your VCN is configured for Apache server.
You have successfully created an ingress rule that makes your instance available from the internet.

4. Create a Flask Application

Next, set up Flask on your Ubuntu Linux instance and then create and run a Flask application.

Install and Set up Flask

To set up Flask with Python 3, perform the following steps:

  1. Open the navigation menu and click Compute. Under Compute, click Instances.
  2. Click the link to the instance you created in the previous step.

    From the Instance Details page look in the Instance Access section. Copy the public IP address the system created for you. You use this IP address to connect to your instance.

  3. Open a Terminal or Command Prompt window.
  4. Change into the directory where you stored the ssh encryption keys you created in part 1.
  5. Connect to your VM with this SSH command.
    ssh -i <your-private-key-file> ubuntu@<x.x.x.x>

    Since you identified your public key when you created the VM, this command logs you into your VM. You can now issue sudo commands to install and start your server.

  6. Update firewall settings.

    The Ubuntu firewall is disabled by default. However, you need to update your iptables configuration to allow HTTP traffic. To update iptables, run the following commands:

    sudo iptables -I INPUT 6 -m state --state NEW -p tcp --dport 5000 -j ACCEPT
    sudo netfilter-persistent save

    The commands add a rule to allow HTTP traffic through port 5000 and saves the changes to the iptables configuration files.

  7. Install pip3 for Python 3.
    sudo apt update
    sudo apt install -y python3-pip
  8. Install and activate a virtual environment plus a virtual environment wrapper.

    You can use a virtual environment to manage the dependencies for your project. Every project can be in its own virtual environment to host independent groups of Python libraries.

    The virtualenvwrapper is an extension to virtualenv. It provides a set of commands, which makes working with virtual environments much more pleasant. It also places all your virtual environments in one place. The virtualenvwrapper provides tab-completion on environment names.

    pip3 install virtualenv
    pip3 install virtualenvwrapper
  9. Set up your virtual environment wrapper in .bashrc.

    Update the file:

    sudo vi .bashrc

    In the file, append the following text and save the file:

    # set up Python env
    export WORKON_HOME=~/envs
    export PATH=$PATH:/home/ubuntu/.local/bin
    export VIRTUALENVWRAPPER_PYTHON=/usr/bin/python3
    export VIRTUALENVWRAPPER_VIRTUALENV_ARGS=' -p /usr/bin/python3 '
    source /home/ubuntu/.local/bin/virtualenvwrapper.sh

    Activate the preceding commands in the current window.

    source ~/.bashrc
  10. Start a virtual environment.
    mkvirtualenv flask01
    The command returns: (flask01) ubuntu@<ubuntu-instance-name>:~$
  11. Install Flask.
    pip3 install Flask
  12. Create a "Hello, World!" application.

    Create the file:

    sudo vi hello.py

    In the file, input the following text and save the file:

    from flask import Flask
    app = Flask(__name__)
    
    @app.route('/')
    def hello_world():
        return 'Hello, World!'
    
    if __name__ == "__main__":
        app.run(host="0.0.0.0", port=int("5000"), debug=True)
  13. Run the Python program.
    export FLASK_APP=hello.py
    flask run --host=0.0.0.0
  14. You can now test your application framework.

    From a new terminal, connect to your Ubuntu VM with your SSH keys, and then in the command line enter curl localhost:5000. Or, you can connect your browser to the public IP address assigned to your VM: http://<x.x.x.x>:5000.

    The app returns Hello World! on your VM, or in your browser.
Congratulations! You have successfully installed Flask on your Oracle Cloud Infrastructure VM.

What's Next

You have successfully installed Flask and created a Python application on Oracle Cloud Infrastructure using an Ubuntu VM.

To explore more information about development with Oracle products check out these sites: