Load Data into Autonomous Data Warehouse Using a Data Loader Task

A data loader task helps you transform and load data into data lakes or other targets such as Oracle Autonomous Data Warehouse.

The source data for loading can come from one data entity or multiple data entities in a schema.

In this tutorial, you:

  1. Create a data loader task to transform and load data from a single Object Storage data entity into Autonomous Data Warehouse.
  2. Publish the data loader task to an Application.
  3. Run the data loader task.

1. Creating a Data Loader Task

  1. In the tab bar, click Open tab (plus icon), and then select Projects.
  2. On the Projects page, click DI_Lab.
  3. On the DI_Lab project details page, click Tasks in the left submenu.
  4. On the Tasks page, click Create task and select Data loader.

    The Create data loader task page opens in a new tab. Numbered and named steps at the top guide you through the configuration. A check mark displays on a step icon after you configure the step. To move between steps, click Next or Previous. You can also navigate directly to a configured step by selecting the icon.

  5. On the Create data loader task page, Basic information step, select the following:
    For this itemSelect
    Source type File storage
    Target type Database
    Load type Single data entity
  6. For the task Name, enter Load Revenue Data into Data Warehouse. Then click Next to navigate to the next step.

    A check mark displays on the Basic information step icon after you have configured the step.

  7. On the Source step, select the following:
    For this itemSelect
    Data asset Data_Lake
    Connection Default Connection
    Compartment The compartment that has the bucket in which you have uploaded the sample data file, REVENUE.CSV
    Bucket The Object Storage bucket that contains the sample CSV file
  8. Under File settings, select the following:
    For this itemSelect
    File type CSV
    Compression type Auto (Default)
    Data has header the check box
    Delimiter COMMA

    You can leave the default settings as-is in the remaining fields.

  9. Under Available data entities, select the check box for REVENUE.CSV and then click Set as source.

    The name REVENUE.CSV displays next to Selected data entity.

  10. Click Create to save the task and continue editing.
  11. Click Next to advance to the Target step, and then select the following:
    For this itemSelect
    Data asset Data_Warehouse
    Connection Default Connection
    Schema BETA
  12. Under Staging location, you can use the default staging location that was set up when you created the target data asset.

    Alternatively, you can deselect the check box to select another Object Storage bucket.

  13. Under Target data entities load settings, click Create new data entities.

    Insert is the default Integration strategy.

  14. Under Target data entity name options, select Specify entity name. Then in the Entity name field, enter REVENUE_TARGET.
  15. Click Save to save the task and continue editing.
  16. Click Next to navigate to the Transformation step.

    The interactive Data Xplorer is displayed. On the Attributes tab, the attributes from the data entity REVENUE.CSV are shown.

  17. Under Attributes, locate SRC_ORDER_NUMBER. Then from the transformations icon (three dots) for SRC_ORDER_NUMBER, select Null Fill Up.

    Transformation menu

  18. In the Null Fill Up dialog, do the following:
    • Enter Not Available in the Replace by field.
    • Do not select Keep source attributes.
    • Leave the Name and remaining fields as-is.
  19. Click Apply.
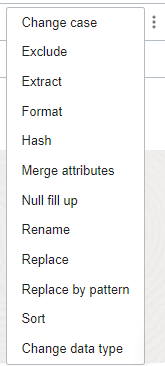
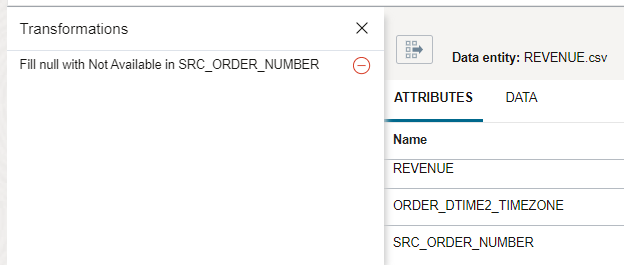
  20. Click the Transformations icon next to the data entity name.

    Transformation panel expansion button

    The Transformations panel opens, where you can review the list of transformations that are applied to the source dataset. To remove a transformation, click the delete icon next to the transformed attribute name.

    Transformation panel expanded

  21. To close the Transformations panel, click the X icon.
  22. Next to Attributes, click Data to navigate to the Data tab and locate SRC_ORDER_NUMBER.

    The null values in SRC_ORDER_NUMBER have been replaced with the string Not Available.

  23. Click Next to navigate to the Review and validate step.

    Validation of the task begins automatically.

    A summary of the configuration details for each step is presented in a block. If you make changes to a step's configuration, navigate to the Review and validate step to validate the task again.

    The result of the task validation is shown in the last block, Validation.

  24. If validation is successful, click Save and close.

2. Publishing a Data Loader Task

  1. On the DI Lab project details page, click Tasks in the submenu.
  2. In the Tasks list, locate Load Revenue Data into Data Warehouse.
  3. Click the actions icon (three dots), and then select Publish to application.
  4. In the Publish to application dialog, select Lab Application.
  5. Click Publish.

    A notification message displays, with a link to the Application to view the published task.

  6. Select View application in the notification. Then select X to close the notification.

    The Patches list on the Application details page displays. When you publish a task, one patch entry is created in the Application.

  7. On the Patches list, you can monitor the patch status. Click Refresh to get the latest status updates.

    A patch is an update made to the Application. When you publish a task, a Publish patch is created. When you unpublish a task, an Unpublish patch is created. Learn more about Patches.

    When the status of the patch changes to Success, a published task entry is created on the Tasks list of the Application details page.

3. Running a Data Loader Task

  1. In the tab bar, click Open tab (plus icon), and then select Applications.
  2. Click Lab Application to open the details page.
  3. On the Application details page, click Tasks.
  4. On the Tasks list, select Run from the actions icon (three dots) for Load Revenue Data into Data Warehouse.

    A notification message displays, and the Runs list appears. A data loader task run is created on the Runs list. Use the Runs list to view all task runs and their statuses.

  5. On the Runs list, click Refresh to get the latest task run status updates.

    Learn more about task runs.

    When the run status turns to Success, you can see the values for Data read and Rows written.